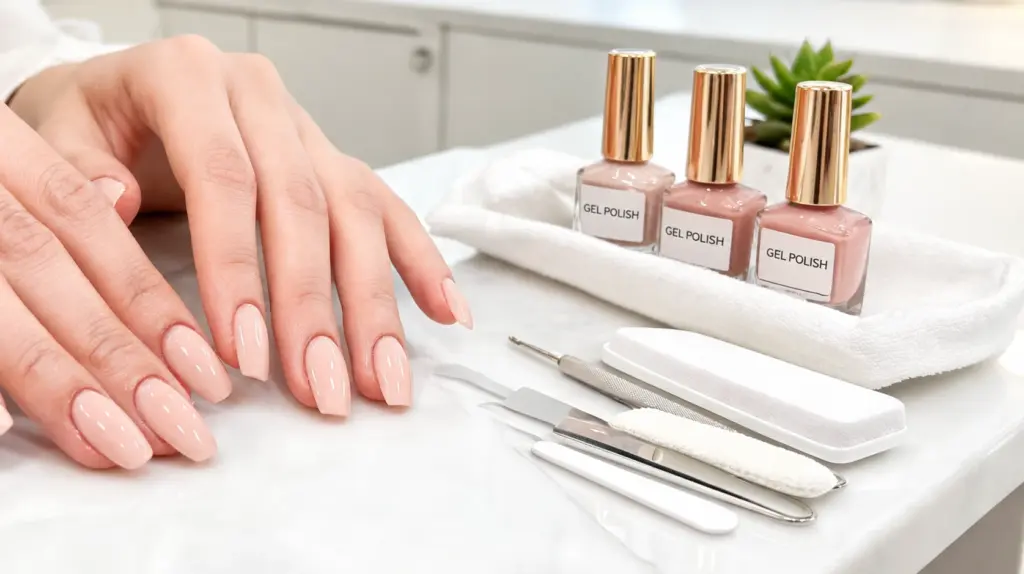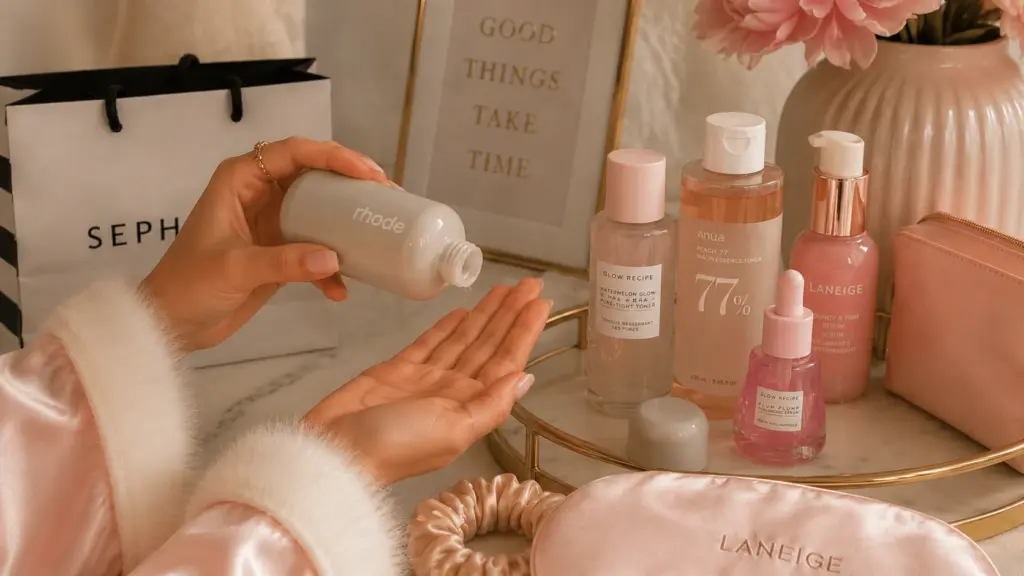
Tired of spending your precious hours on nail art that still looks flat and ordinary? There is a smarter way to get beautiful, artistic nails at home, and it starts with one product.
Blooming gel is a special type of gel that causes color to spread and flow naturally across the nail, creating soft, artistic effects without any advanced skills. It has taken the nail world by storm because the results look professional with very little effort.
Blooming gel nails work for florals, marble, watercolor, galaxy looks, and so much more, all from a single formula.
This breakdown covers trending designs, easy how-to guidance, and practical tips to help you get the most out of every application.
Ready to see what your nails are truly capable of?
The Basics of Blooming Gel
Blooming gel is a water-based, low-viscosity nail product that reacts chemically with wet gel polish to produce soft, fluid patterns right on your nails.
When applied over an uncured layer, it breaks surface tension, pushing color outward to form feathered effects, think soft watercolor washes, cloud-like shapes, or spreading florals.
Unlike standard gel polish, which holds its position once laid down, blooming gel is reactive by nature; it shifts and spreads in ways no brush can fully control.
If you have ever stared at a nail photo wondering how that dreamy, painterly look was achieved, I can tell you, this is likely the product behind it.
You only need color, gel, and a steady hand to get started.
Blooming Gel vs. Gel Polish: Which One Should You Choose?
Choosing between blooming gel and regular gel polish really comes down to the style and effect you want to achieve. Check out this quick comparison table to help you decide which one suits your needs.
| Feature | Blooming Gel | Gel Polish |
|---|---|---|
| Best Use | Nail art and design layering | Solid color coverage for a clean, polished look |
| Texture | Creates a flowing, blended design effect | Smooth, opaque color with no blending |
| Curing Process | Left uncured to blend, then cured after design | Cured after each coat for full opacity |
| Flexibility | Great for intricate designs | Ideal for simple, everyday manicures |
| Application | Applied as a design layer over other gels | Applied as a full nail color |
| Appearance | Flowing, artistic, soft gradients or patterns | Solid, precise color finish |
The Latest Blooming Gel Nail Trends
Blooming gel nail art in 2026 is evolving with creative designs like marble effects, layered florals, and ombre fades. The technique pairs well with chrome powders and neon pigments, giving designs a fresh edge.
Abstract ink-drop art is also trending, featuring bold, contrasting colors. Blooming gel has become a go-to for intricate, artistic nail designs that feel intentional and stand out.
Trending Designs in 2026:
- Marble Effects: Pair neutral blooming gel with gray or gold pigments for veined marble nails.
- Floral Patterns: Use a fine brush to create petal shapes, adding dots for realistic designs.
- Ombre Fades: Layer contrasting blooming gel colors for a seamless gradient effect.
1. Blooming Gel Nails for Every Season
Blooming gel is versatile, adapting to each season’s unique vibe. From soft pinks in spring to icy blues in winter, changing the color palette makes this nail style fresh year-round.
Each season brings out new opportunities for creative and vibrant designs, ensuring your nails always feel current.
- Spring Palette: Soft lavender and blush tones on a sheer base for light, floral looks.
- Fall Tones: Rich rust, terracotta, and plum on nude bases for a moody effect
- Winter Looks: Icy white and silver ink drops on dark gel for a striking frost-inspired design.
2. Blooming Gel and Negative Space Nails
Negative space and blooming gel are a perfect match, combining bare nail areas with soft, organic color spreads. Geometric cutouts, half-moon bases, and tip-only applications create a clean, modern finish.
This contrast between bare nails and the fluid blooming gel effect adds visual interest and sophistication.
- Geometric Cutouts: Tape off shapes before applying blooming gel for sharp, defined negative space.
- Half-Moon Base: Apply blooming gel to the upper half of the nail, leaving the base clear for a minimal look.
3. Metallic and Shimmery Blooming Gel Designs
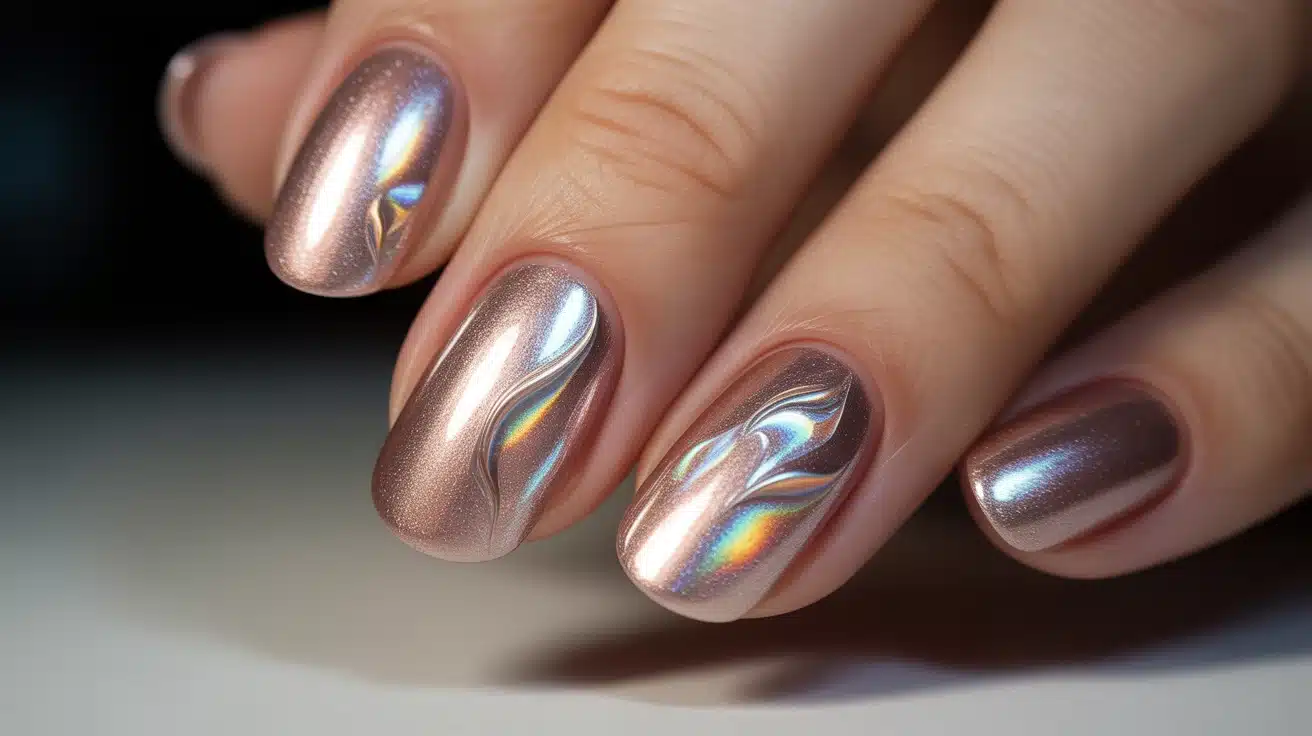
Metallic and shimmer effects elevate blooming gel nails, creating luxurious, high-end designs. Adding rose gold, champagne, or holographic pigments to uncured blooming gel results in rich, reflective patterns.
These designs work beautifully on longer nails, with the gel’s spreading effect fully developing.
- Rose Gold Drops: Drop rose gold ink into blooming gel for a soft, luxurious spread.
- Holographic Shimmer: Fine holographic pigment creates a light-catching effect.
- Champagne Layers: Layer champagne metallic ink over a neutral base for a refined finish.
Creative Inspirations for Blooming Gel Nail Designs
Get inspired by these creative blooming gel nail designs that range from floral elegance to bold geometric and celestial styles..
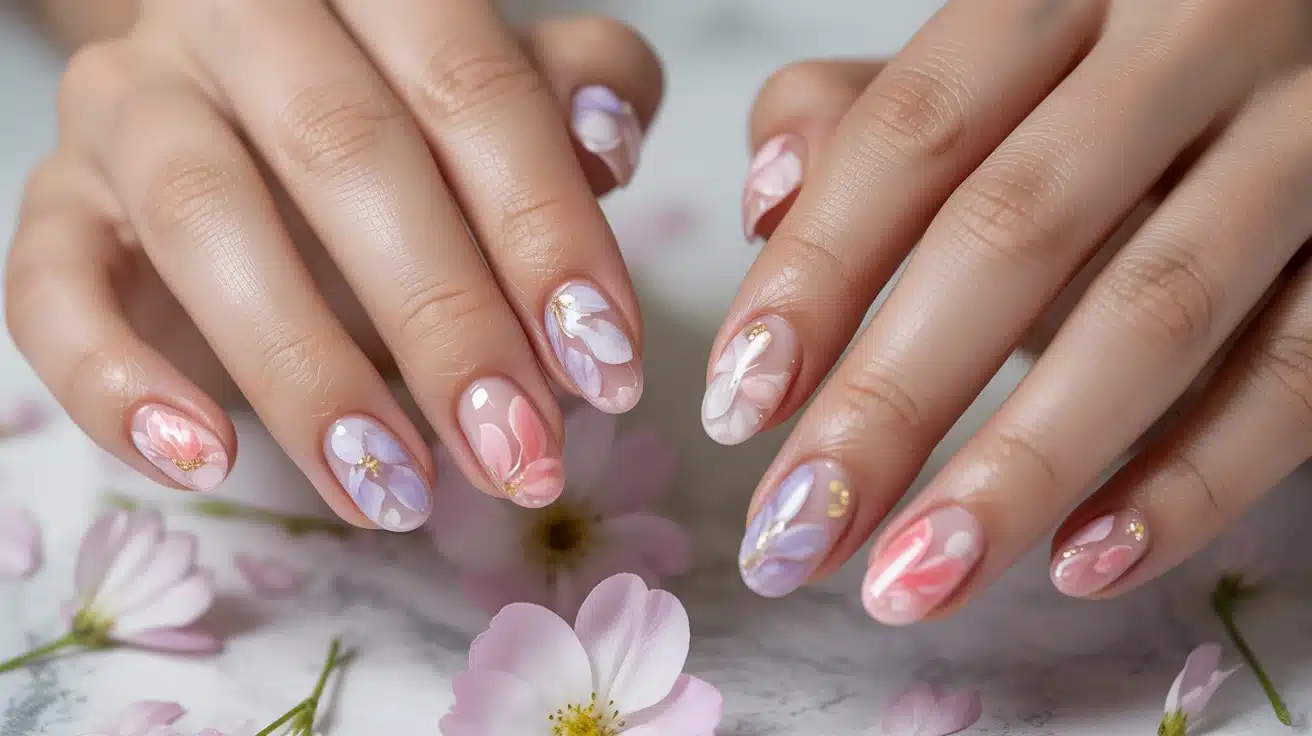
1. Floral Blooming Gel Nails
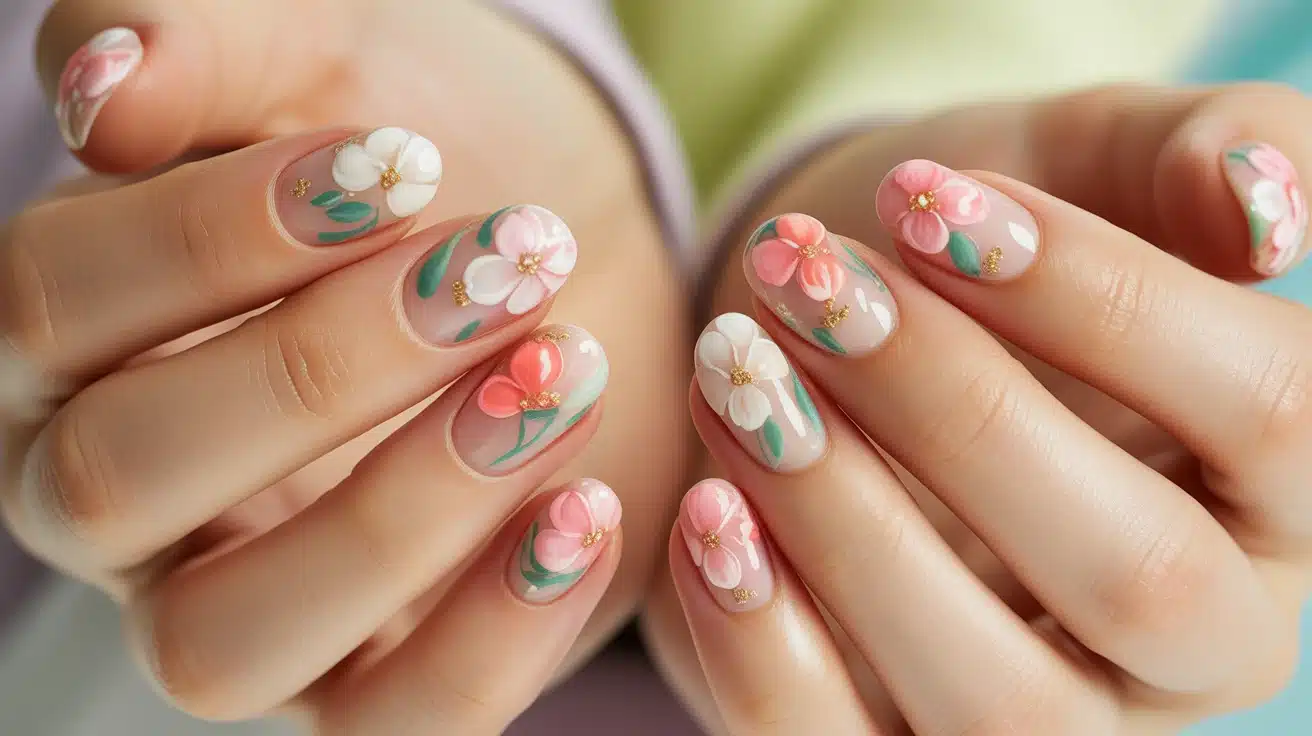
Floral blooming gel nails are among the most sought-after designs for spring and summer.
The blooming gel reacts with regular gel polish to naturally spread pigment, mimicking the soft, organic look of real petals. Roses, cherry blossoms, and wildflowers are popular choices.
Layering multiple colors adds depth, while leaving negative space creates a fresh, airy feel perfect for warmer seasons.
Tip: Apply blooming gel while the base coat is still uncured for the most natural petal spread.
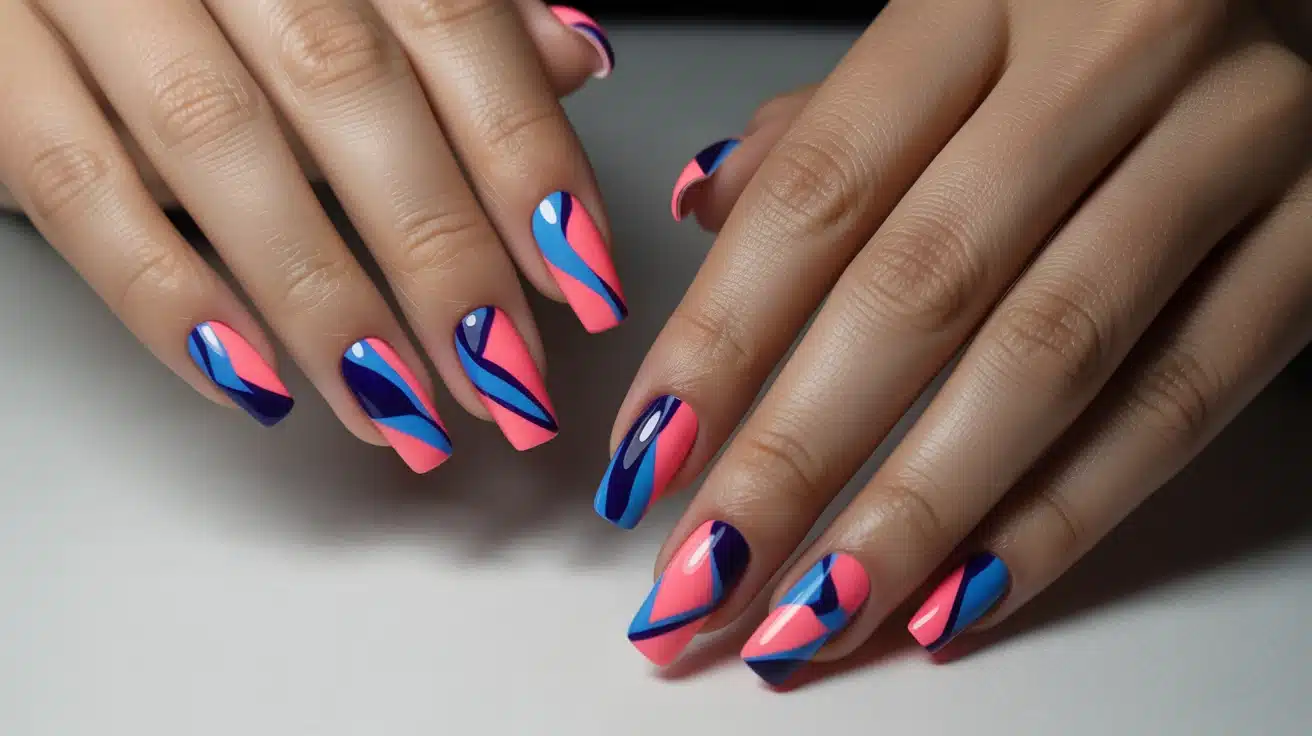
2. Geometric Blooming Gel Nails
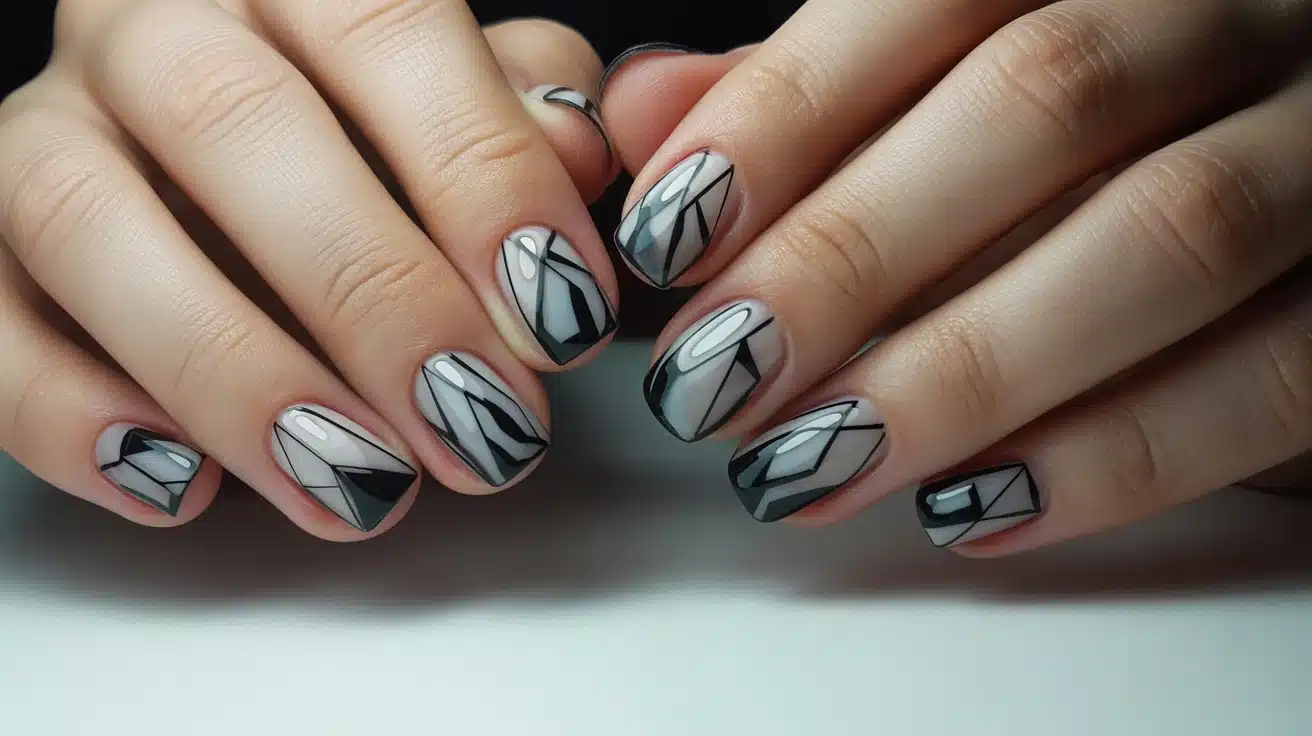
Geometric blooming gel nails offer a bold, modern aesthetic by combining sharp shapes with fluid color movement.
Using tape or stencils alongside blooming gel creates a contrast, structured lines meeting soft, diffused edges. Triangle placements, color-blocked sections, and angular patterns are particularly effective.
This style works beautifully with monochrome palettes or contrasting neon and nude combinations for a high-fashion finish.
Tip: Seal geometric edges with a thin layer of top coat before blooming to keep lines crisp.
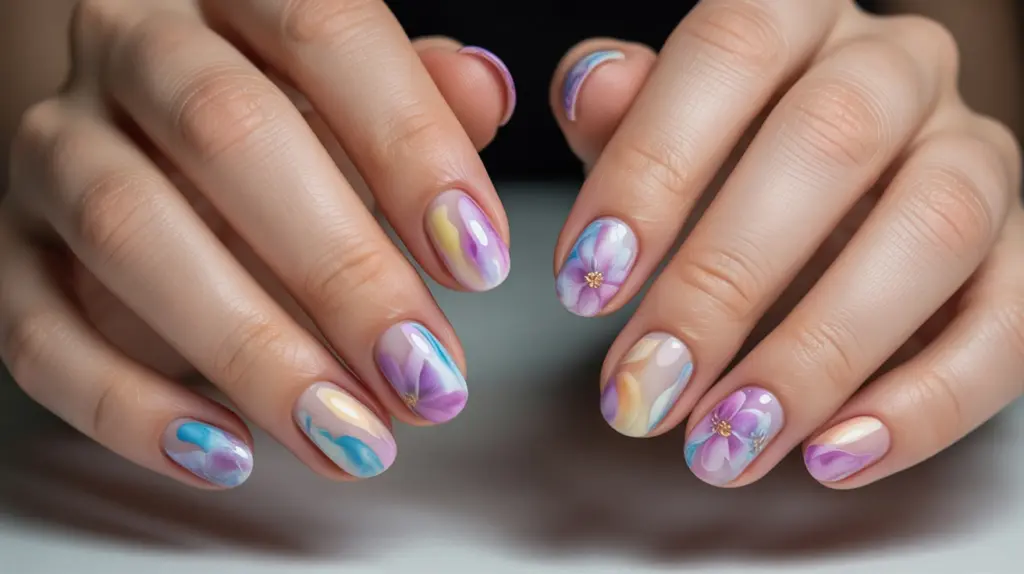
3. Watercolor Effects with Blooming Gel
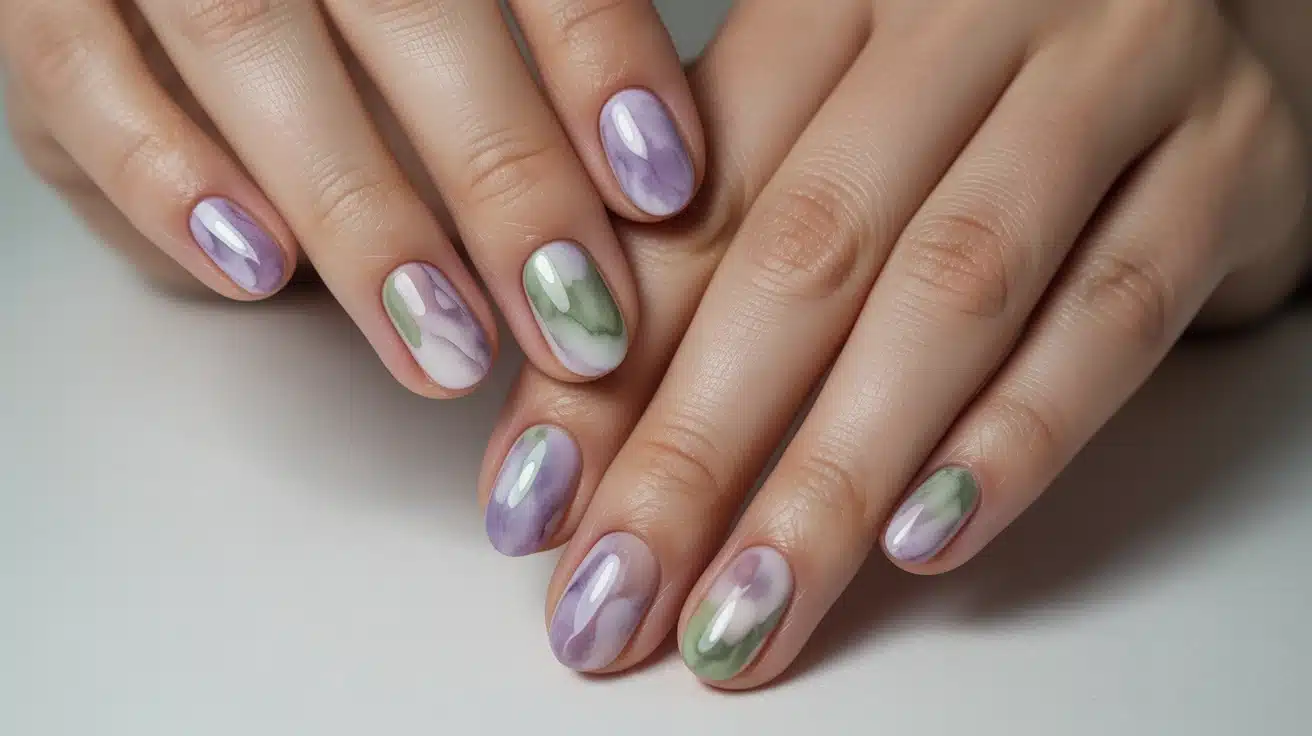
Watercolor nail art replicates the delicate, translucent look of painted watercolors on a sheer or white base. Blooming gel softens pigment edges naturally, blending colors into one another without harsh lines.
Soft pinks, lavender, dusty blues, and coral tones work exceptionally well.
The key is using light pigment deposits and allowing colors to bleed freely, creating a romantic, painterly finish with every application.
Tip: Work on one nail at a time to control how far the colors spread before curing.
4. Minimalist Blooming Gel Nails
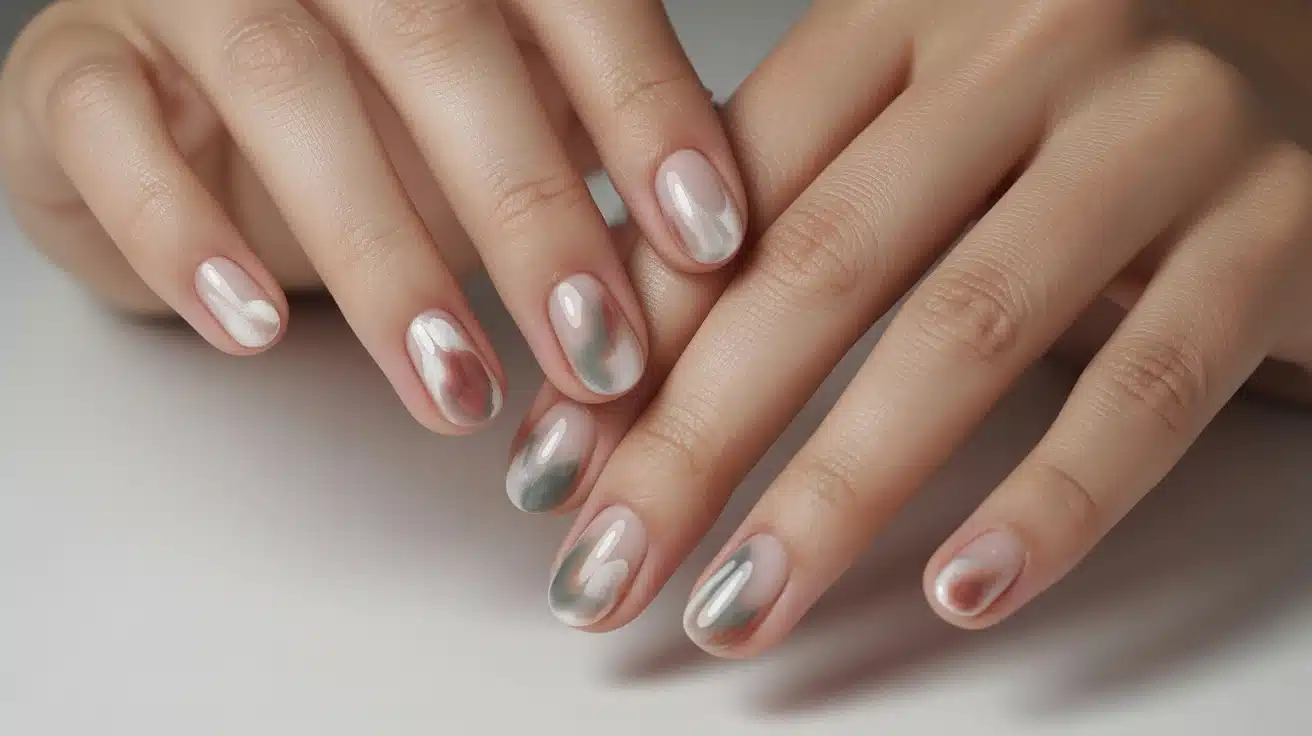
Minimalist blooming gel nails focus on restraint and elegance. A single ink drop on a nude or translucent base creates a refined, gallery-worthy look.
Subtle tonal designs, like soft grey on white or blush on ivory, give a sophisticated, barely-there effect. This style appeals to those who appreciate understated beauty.
The organic nature of blooming gel ensures each nail carries a unique, natural pattern without feeling overdone.
Tip: Use a fine detail brush to place small, controlled pigment drops for precise minimalist patterns.
5. Galaxy & Celestial Blooming Gel Nails

Galaxy-themed blooming gel nails capture the depth and mystery of the cosmos. Deep navy, violet, black, and silver pigments blend together to mimic nebulae and star clusters.
Blooming gel creates an effortless cosmic swirl effect that is difficult to achieve with standard polish techniques. Adding fine holographic glitter or chrome powder after curing enhances the dimensional, space-like appearance across each nail.
Tip: Layer dark tones first, then drop lighter pigments on top to replicate the natural depth of space.
6. Marble Effect Blooming Gel Nails
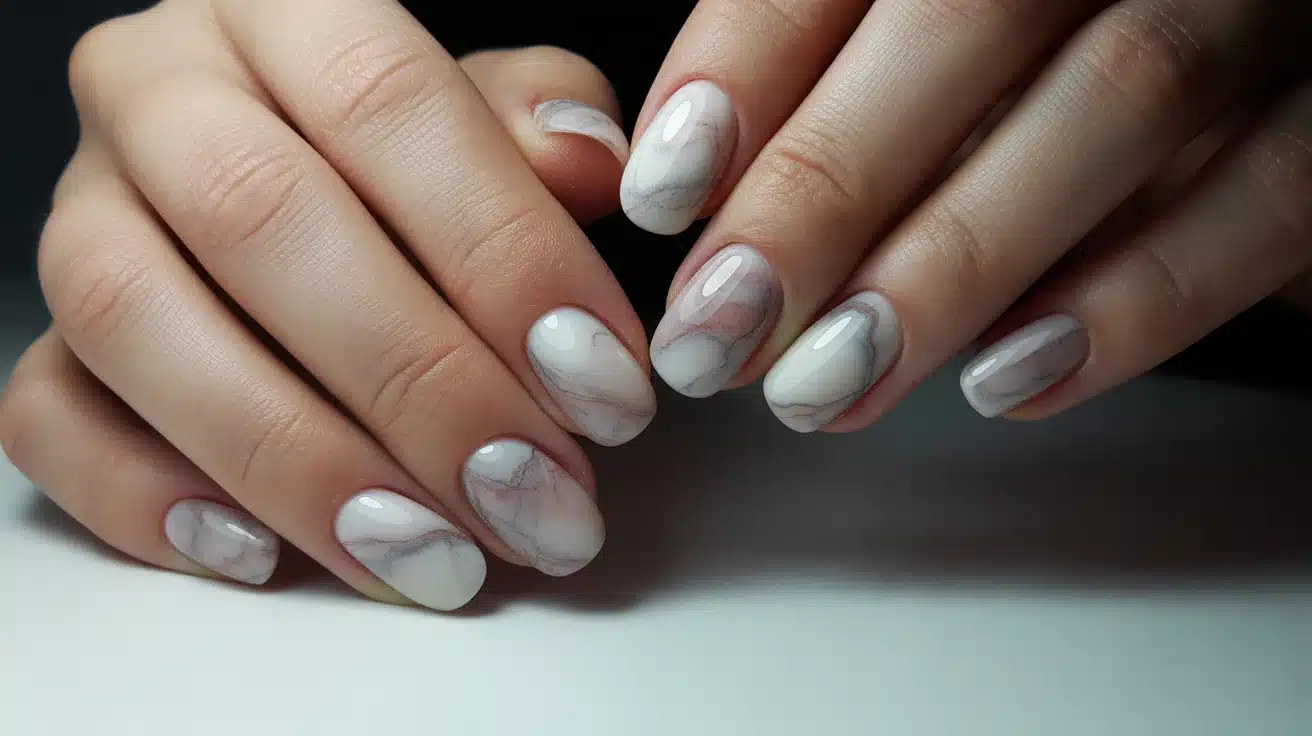
Marble blooming gel nails deliver a luxurious, stone-inspired look that suits every occasion. White, grey, gold, and black pigments are manipulated using blooming gel to form natural-looking veins across the nail.
Unlike traditional marble techniques, blooming gel allows pigment to move freely, creating authentic variation.
This design pairs effortlessly with neutral outfits and works year-round as a timeless, polished nail choice.
Tip: Use a thin nail art brush dipped in black pigment to draw fine veins before the blooming gel fully diffuses.
7. Sunset & Ombre Blooming Gel Nails
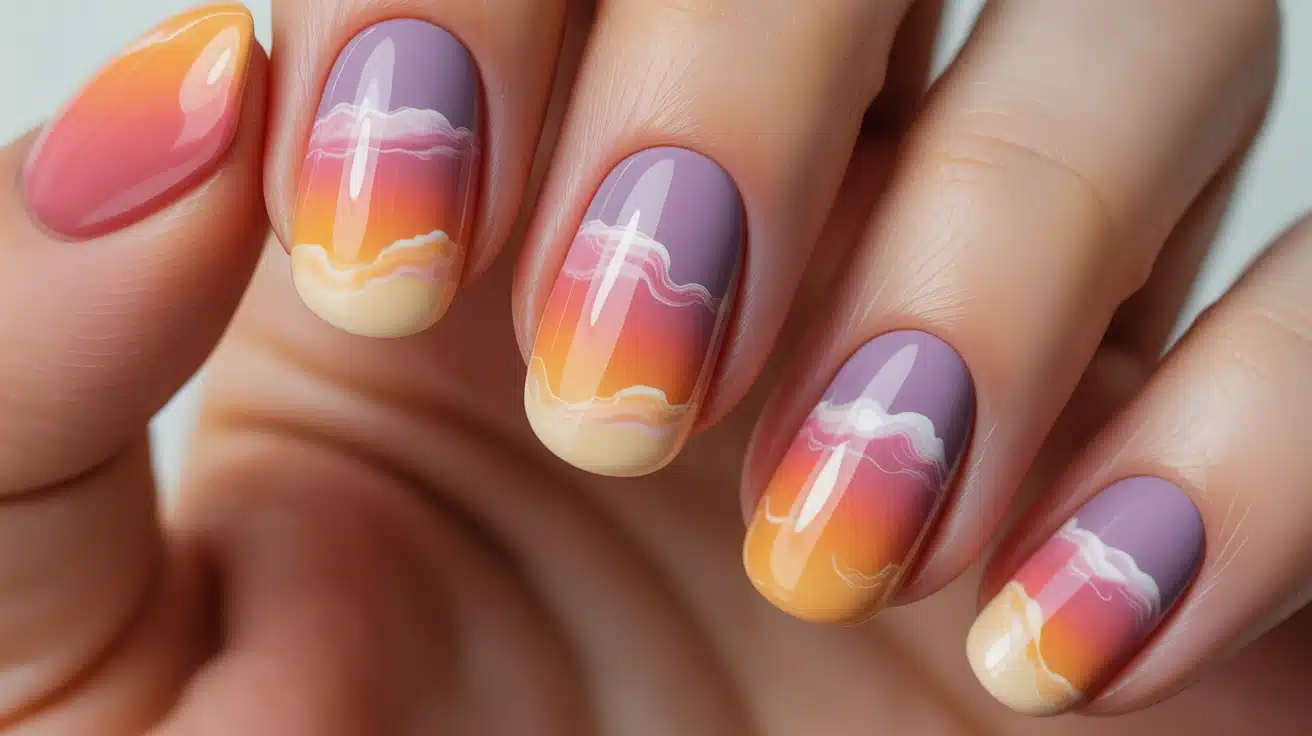
Sunset-inspired blooming gel nails use warm gradients of coral, amber, peach, and magenta to replicate the colors of a fading sky.
Blooming gel blends these shades seamlessly without visible brush strokes, producing smooth, gradient transitions that standard ombre techniques often struggle to achieve.
The result is a vivid, artistic nail look that feels both wearable and eye-catching across all skin tones and nail lengths.
Tip: Place warm tones at the base and cooler hues near the tip to mimic a realistic sunset horizon
Create the Aura Look Using Blooming Gel: 5 Easy Steps
Creating a flawless and eye-catching Aura look with Blooming Gel is easier than you think! Follow these 5 simple steps for a beautifully blended, vibrant nail design. Even if you’re new to nail art or an expert, this technique will surely elevate your manicure to a whole new level!
Tools you’ll Need:
- Base Coat
- Milky Pink Builder Gel
- Thin Nail Art Brush
- Popsicle Gel Color
- Hot Girl Summer Gel Color
- Big Dotting Tool
- Blooming Gel
- Top Coat
- Gelous Cuticle Oil
- Lint-Free Wipe
- Nail Polish Remover
These tools will help you achieve a perfect Aura look with Blooming Gel!
Step 1: Nail Prep and Base Coat Application
Start by preparing your nails thoroughly. Apply a thin coat of Base Coat to your nails, making sure to seal the free edge for better durability. This step ensures the gel bonds properly and reduces chipping. Cure for 60 seconds.
- Better adhesion: Applying the base coat ensures the gel adheres effectively to your nails.
- Seal edges: Capping the free edge prevents lifting and ensures lasting results.
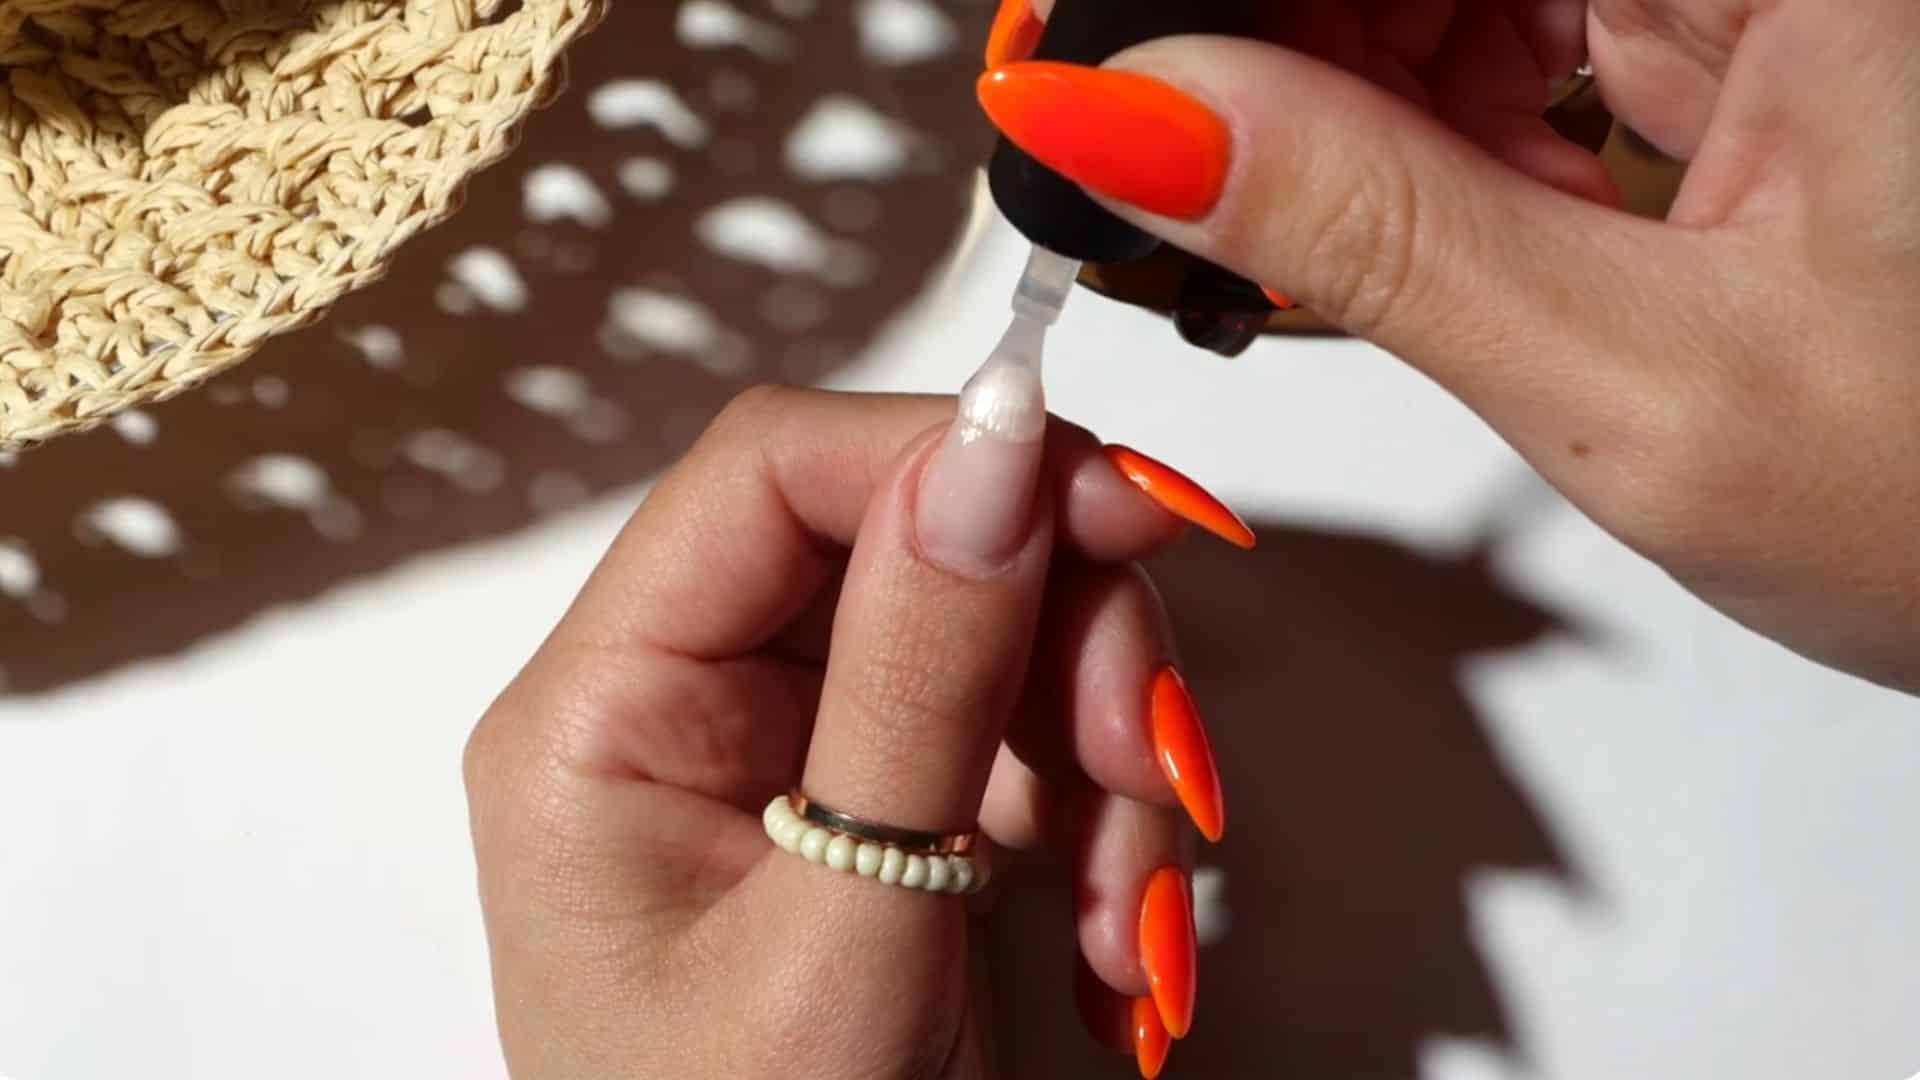
Step 2: Applying Milky Pink Builder Gel
Next, apply a thin coat of Milky Pink Builder Gel, leaving it uncured. This serves as a slip layer, which ensures smooth application. Push a small bead of gel towards the cuticle area without touching the skin to avoid lifting the skin.
- Smooth base: Builder gel smooths out the surface for an even finish.
- Avoid contact: Keeping gel away from cuticles prevents the polish from lifting.
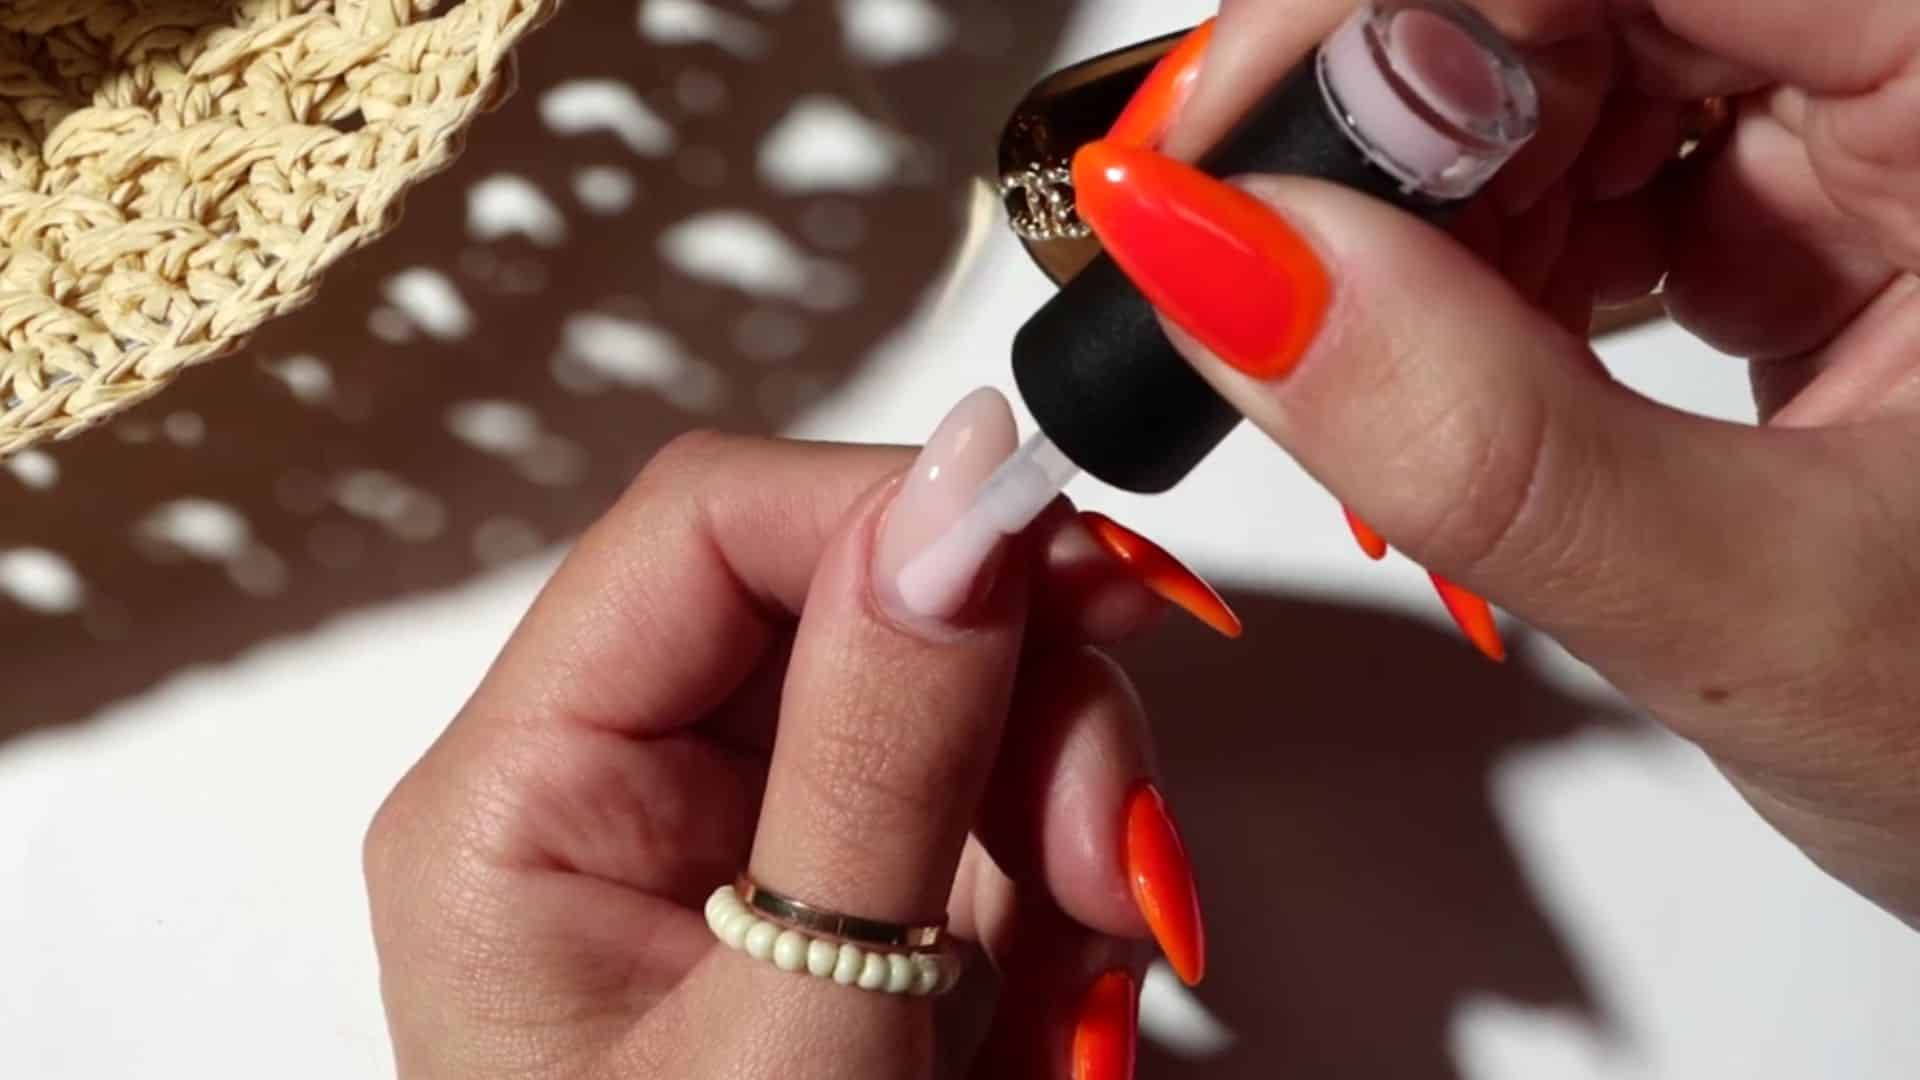
Step 3: Adding Popsicle and Blooming Gel
Apply two thin layers of Popsicle gel polish, curing each layer for 60 seconds. Then, apply a thin coat of Blooming Gel, leaving it uncured. This creates the foundation for your desired effect. Cure for another 60 seconds to set.
- Even coverage: Apply thin layers for better coverage and easier blending.
- Create effect: Blooming gel helps the colors blend seamlessly for a smooth look.
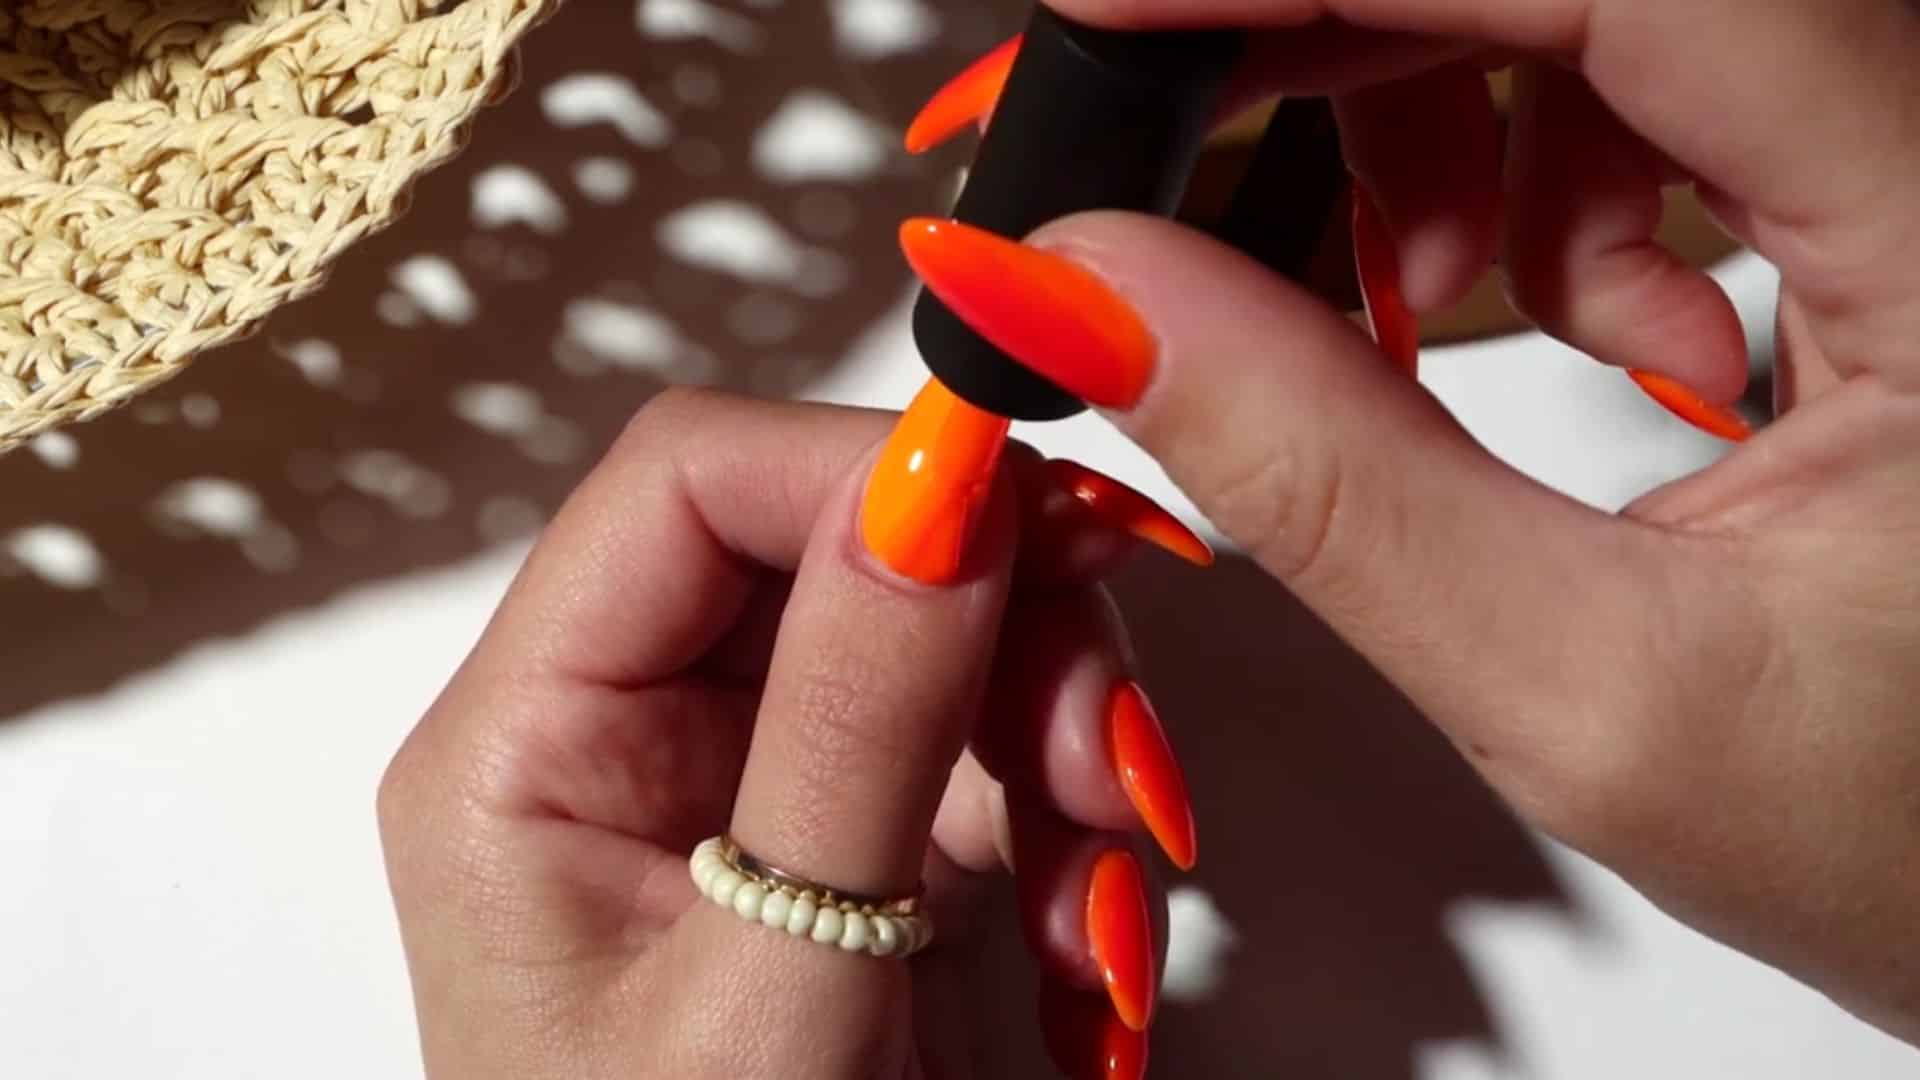
Step 4: Creating the Aura Design with Hot Girl Summer
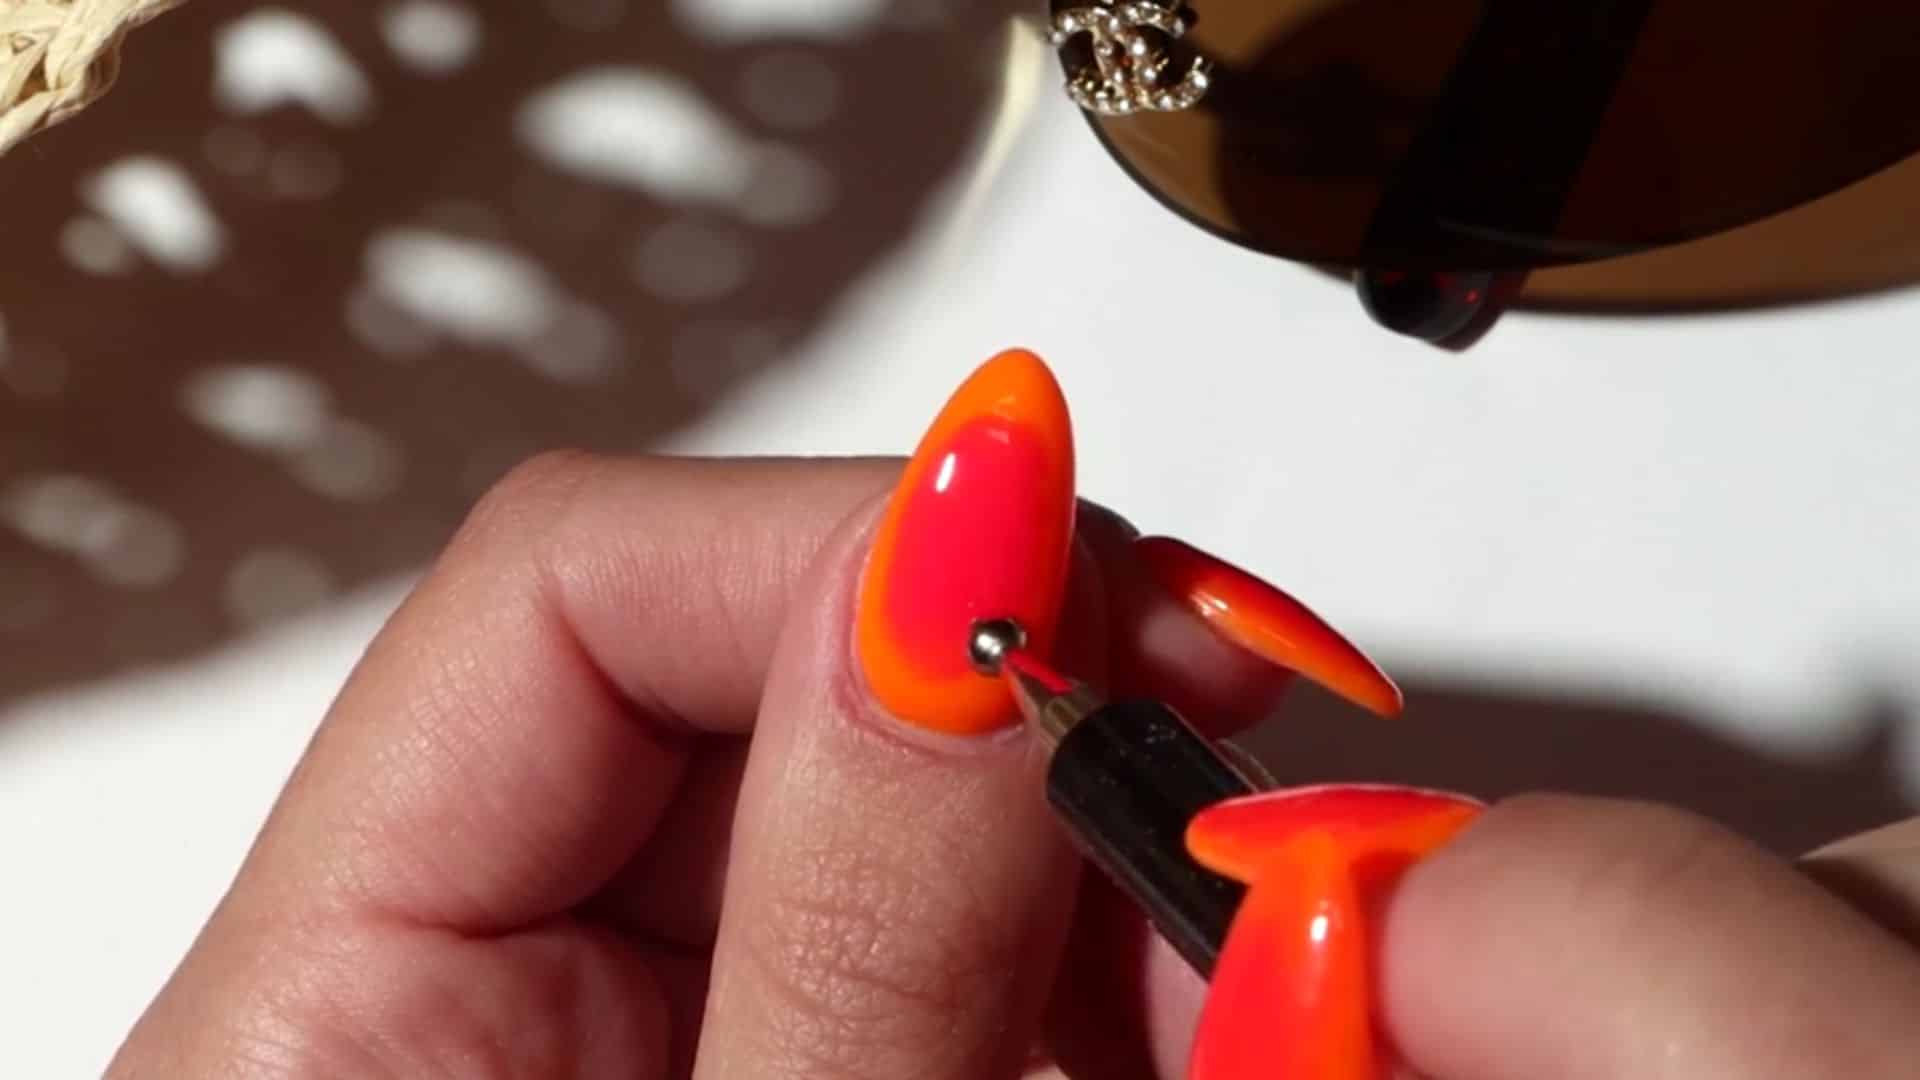
Using a large dotting tool, apply Hot Girl Summer to the center of your nail and spread it gently into a circular shape. The Blooming Gel helps the color spread and blend naturally. Cure for 60 seconds once the design is set.
- Bold dot: Create a vibrant focal point at the center with a generous dot.
- Seamless blending: Blooming Gel ensures a smooth transition between colors.
Step 5: Final Touches with Top Coat and Cuticle Oil
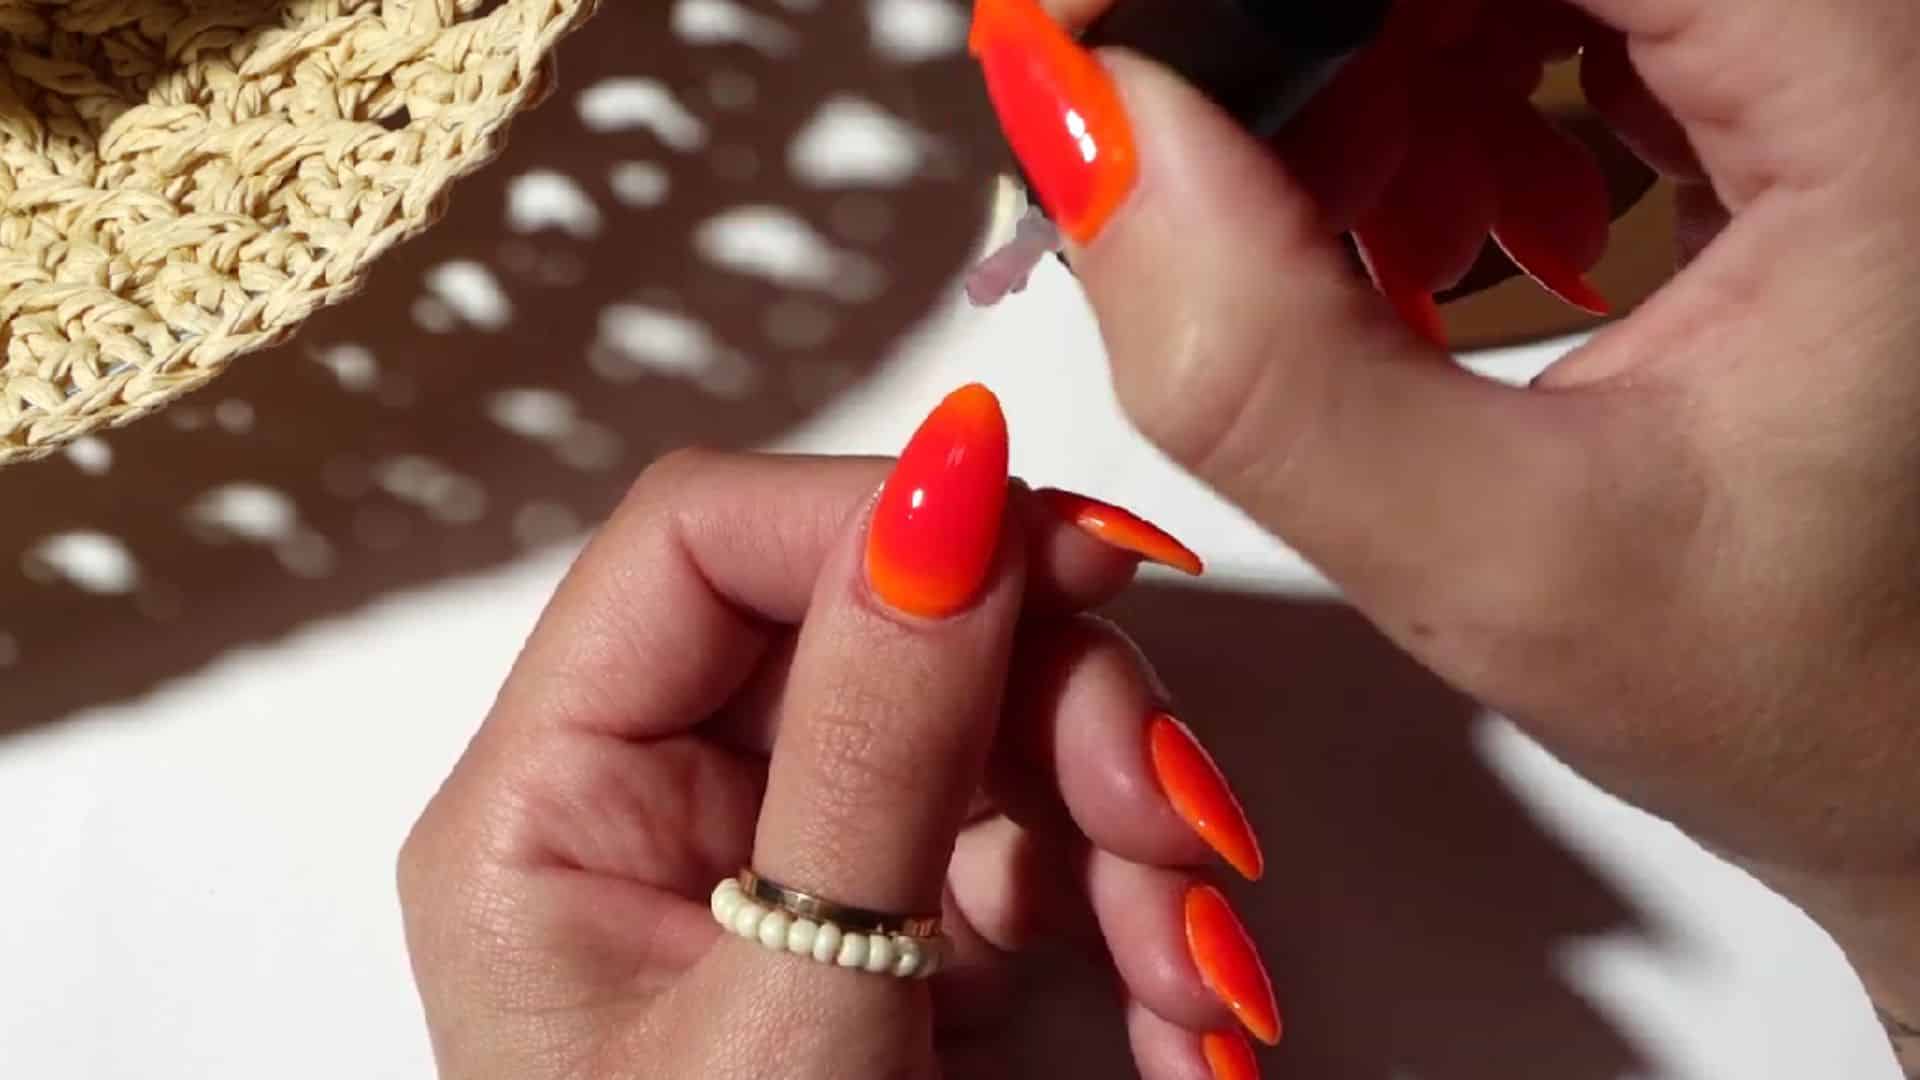
Finish your design by applying a thin layer of Top Coat and curing for 60 seconds. Once done, moisturize your nails and surrounding skin with Gelous Cuticle Oil, rubbing it in to nourish the area and keep your nails hydrated.
- Protection: Top coat seals your design and adds a shiny finish for extra durability.
- Moisturize skin: Cuticle oil nourishes your nails and skin, preventing dryness
Common Mistakes to Avoid with Blooming Gel Nails
Avoid these common blooming gel mistakes to achieve flawless, smooth designs that last and maintain their intended effect.
| Mistake | What Goes Wrong | How to Fix It |
|---|---|---|
| Over-Spreading | Too much blooming gel causes muddy designs. | Use minimal gel and apply it only where needed. |
| Uneven Coverage | Inconsistent layers result in patchy designs. | Apply smooth, even base coat layers before blooming gel. |
| Improper Curing | Curing too early or late disrupts the effect. | Wait for the desired spread, then cure promptly. |
| Wrong Base Consistency | Thick or dry base coats prevent proper blooming. | Use a freshly applied, uncured base coat for better interaction. |
| Incompatible Products | Some gel polishes don’t react well with blooming gel. | Test compatibility before applying blooming gel. |
| Overloading Pigment | Too much pigment creates blotchy, heavy designs. | Use a fine brush or toothpick for small, controlled pigment drops. |
Tips for Long-Lasting Blooming Gel Nails
Follow these essential tips to ensure your blooming gel nails stay vibrant, durable, and fresh-looking for longer.
- Proper Nail Prep: Ensure nails are clean and dry before applying blooming gel to prevent lifting and ensure better adhesion.
- Quality Topcoat: Seal your design with a high-quality topcoat to protect your blooming gel nails from chips and fading.
- Aftercare Tips: Moisturize cuticles regularly and avoid harsh chemicals to keep your nails strong and the design looking fresh.
- Durable Brands: Choose top-rated brands like Born Pretty, Modelones, or Gelish for long-lasting, vibrant, blooming gel nails
Blooming Gel Nails on Different Nail Shapes
Explore how blooming gel designs complement various nail shapes for a customized, stunning look.
| Nail Shape | How Blooming Gel Looks | Best Design Approach |
|---|---|---|
| Stiletto | Dramatic canvas, elongated tip | Ombre effects or large floral drops at the center |
| Almond | Soft, tapered shape | Delicate petals near the cuticle flow to the tip |
| Square | Wide, flat surface | Geometric patterns with clean lines using tape |
| Coffin | Broad flat tip, tapered sides | Galaxy, marble, or sunset designs across the nail |
| Round | Soft, classic look | Subtle blooms or pastel blends for a natural look |
| Oval | Balanced canvas | Floral or marble designs for a naturally organic feel |
Final Thought
Blooming gel nails offer a unique way to create stunning, flowing designs that are perfect for any occasion. With the right technique, you can craft everything from delicate florals to bold geometric patterns.
The key to mastering blooming gel is understanding how it reacts with other gels and how to control its spread.
By following the tips shared here, like using minimal gel, ensuring proper curing, and choosing the right products, you can achieve long-lasting, beautiful nails.
Remember, blooming gel is all about creativity and experimentation, so don’t be afraid to try new designs. Share your favorite blooming gel ideas or try out these techniques to see how they work for you.