
Most master closets fail for the same reason: one rod and one shelf were put in during construction, and nobody changed the layout after that.
The problem is never the person using it. It’s the setup. A well-designed master closet needs specific zones for hanging clothes, folded items, shoes, and accessories. Not just space to shove things into.
This guide covers everything I’d think through before touching a closet: the right sizing for one or two people, which layout suits the space, what every master closet genuinely needs to include, and how to decide between a DIY system, semi-custom, or fully custom build.
These are the elements that separate a closet that holds its shape from one that reverts to chaos within a few weeks. The decisions below need to happen in order: space, layout, zones, then system.
What a Master Closet Actually Needs to Include
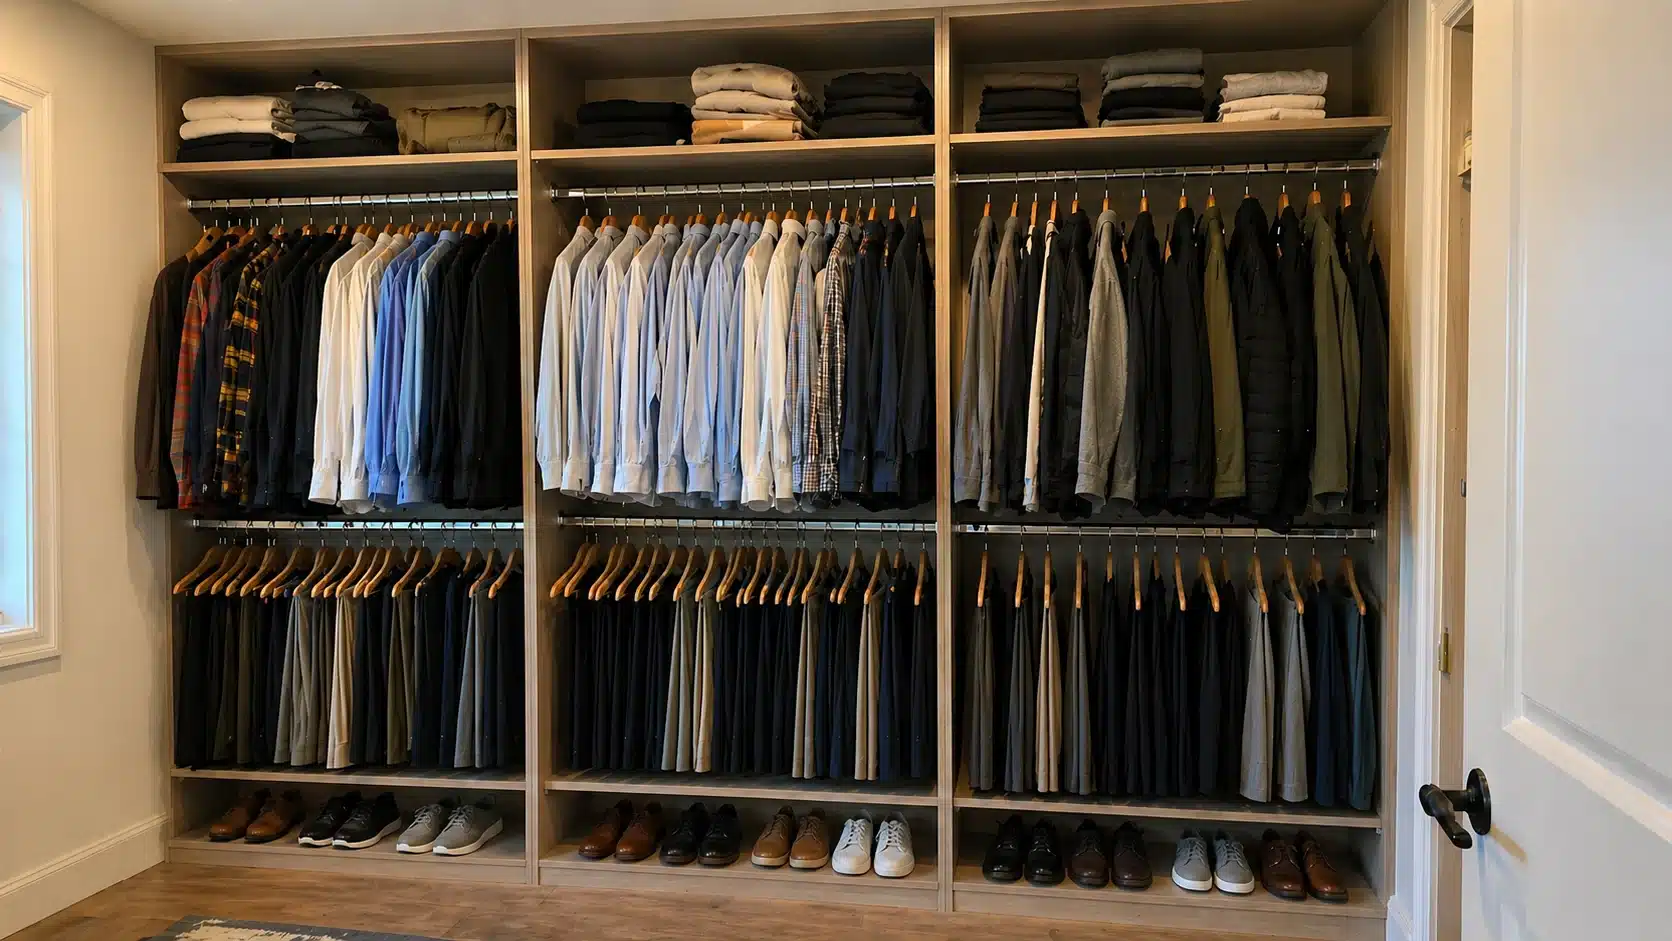
A master closet fails most often because it only plans for hanging clothes. Shoes pile up on the floor, bags end up on shelves meant for folded items, and accessories migrate to every available surface. That isn’t disorganisation. It’s a zoning problem.
Every item category needs a dedicated place, and the most-used items should sit at the most accessible level. Here’s how those zones break down:
| Storage Zone | What Goes Here | Key Detail |
| Long-hang rod | Dresses, coats, full-length trousers | 68 inches minimum rod clearance |
| Double-hang rod | Shirts, blazers, jackets | Two stacked rods; doubles the capacity of that section |
| Folded items | Sweaters, jeans, activewear | Drawers or deep shelves; roll items to save space |
| Current season shoes | Daily work and casual footwear | Eye level, grouped by type |
| Off-season shoes | Boots, formal, seasonal footwear | High shelves or under-bed organisers |
| Accessories | Belts, bags, scarves, necklaces | Hook rails and labelled fabric boxes |
| Outfit staging | Next-day and pressed clothing | Pull-out valet rod. Most under $20 |
| Seasonal storage | Off-season clothing, bulky knitwear | Shelves 12–18 inches below the ceiling |
I’d assign every zone before anything goes back in. A system built around what the wardrobe actually contains takes much less effort to maintain and almost never needs a full reset.
Once the zones are mapped, the next question is which layout fits the physical space.
Master Closet Size: How Much Space You Actually Need
The numbers matter here before you commit to any layout or system. Three measurements determine everything: floor dimensions, ceiling height, and wall interruptions like outlets, windows, or vents that break usable storage runs.
- For a single user, 4×5 feet is the functional minimum for a walk-in.
- For two people, 7×10 feet is the standard working size.
100 square feet is the point where you can put storage on three walls with comfortable movement between them.
Ceiling height gets overlooked, but it matters. Shelves placed in the 12–18 inches below the ceiling recover meaningful storage without touching the main working zones. That space is almost always wasted in standard builds.
| Closet Size | Who It Works For | What’s Realistic |
| 4×4 to 4×5 ft | Single user with a compact wardrobe | Single-sided layout, limited shoe storage |
| 5×7 to 6×8 ft | Single user or light shared use | L-shaped or double-sided layout possible |
| 7×10 ft | Two people with a full shared wardrobe | U-shaped layout, clear per-person zones |
| 10×10 ft or larger | Larger shared wardrobes, luxury builds | U-shaped with center island; 36-inch clearance on all sides |
A 7×10 space with a U-shaped layout and per-person zones covers almost every shared wardrobe situation I’ve seen. A smaller space planned well will always outperform a larger one with no clear structure.
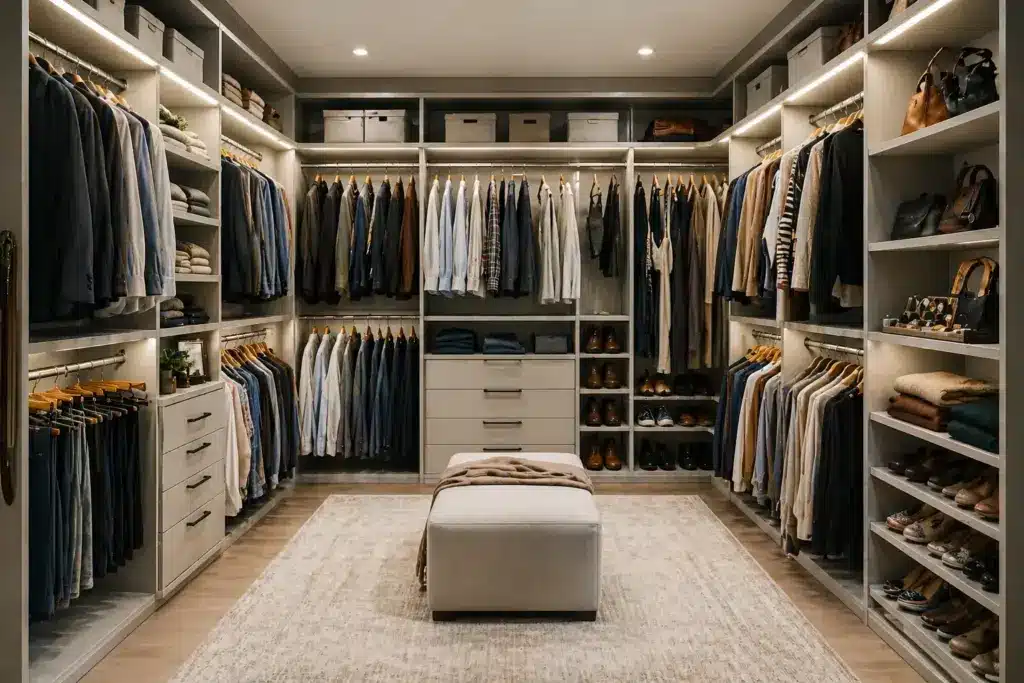
Master Closet Layout Options: What Each One Gives You
Layout is the most structural decision in a master closet design. It determines how much wall storage you get, whether two people can move without getting in each other’s way, and whether the closet makes sense to use quickly in the morning.

| Layout | Minimum Space | Best For | Trade-off |
| Single-sided | 4×4 ft | Small spaces, single user | Limited total storage; no second zone |
| Double-sided | 6×8 ft | Couples, shared closets | Needs 24 inches of aisle clearance; narrow rooms don’t work |
| L-shaped | 6×6 ft | Corner spaces, mixed wardrobes | Corner area can be awkward without planning |
| U-shaped | 7×10 ft | Maximum storage, larger shared closets | Needs real square footage; feels cramped below minimum |
For shared closets, the double-sided and U-shaped layouts both give you the space to assign one side per person. That single decision prevents most of the ongoing disorder in a shared wardrobe. If the space allows it, that’s the direction I’d go.
Using Vertical Space Most Closets Waste
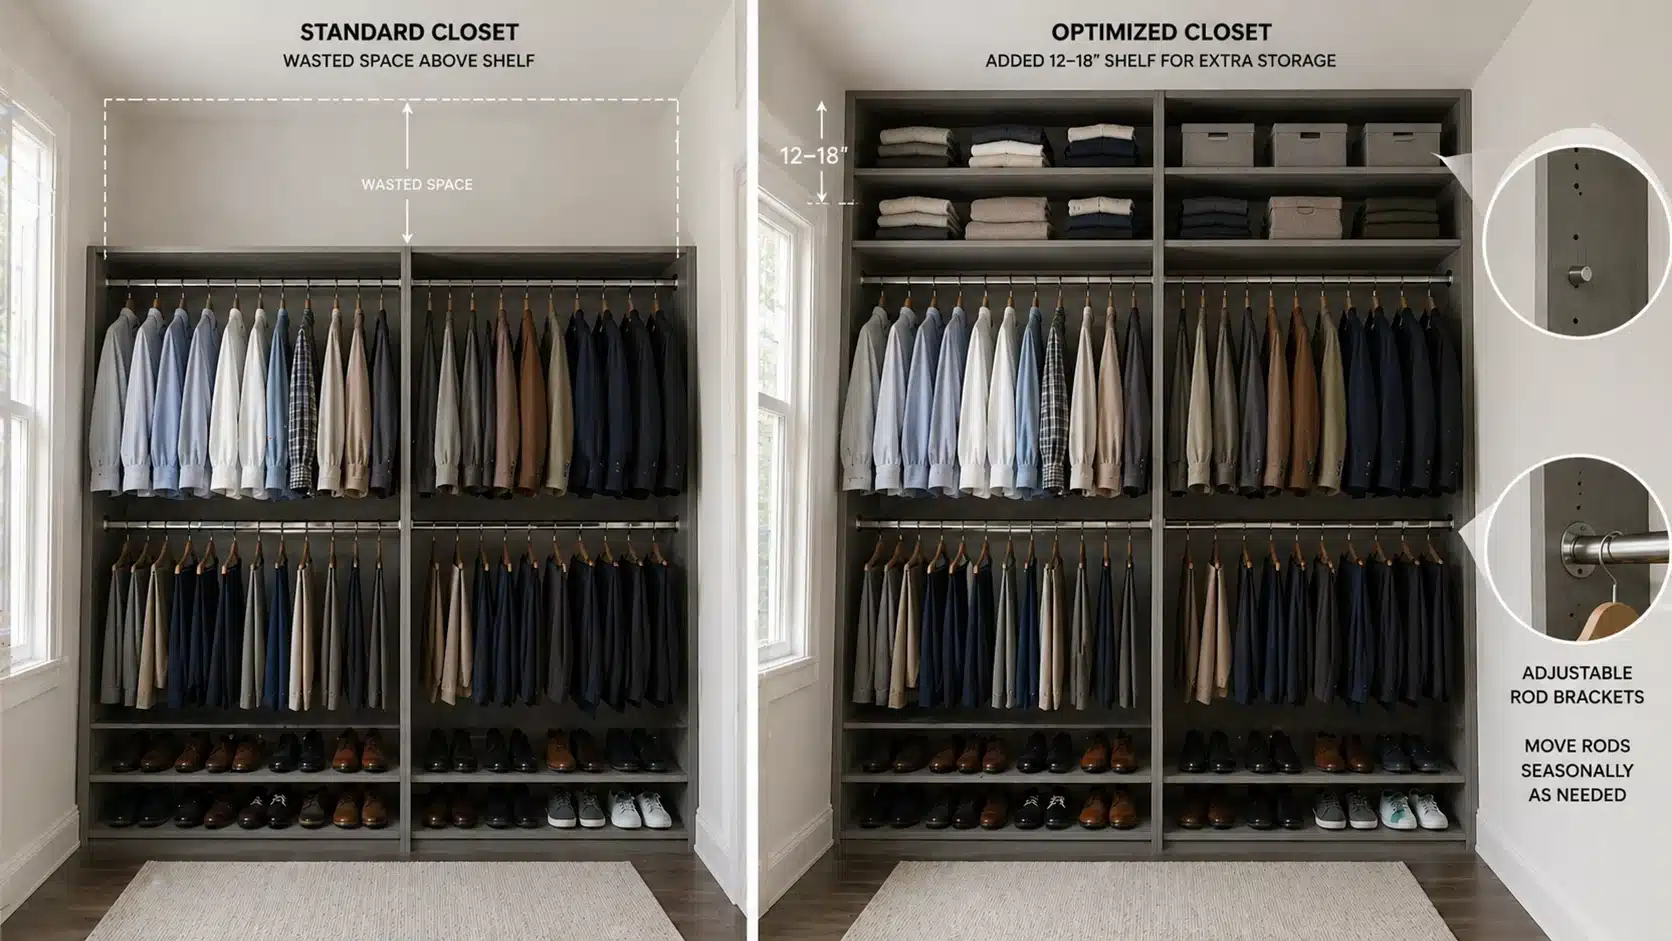
Most closets leave the top third of wall space entirely empty. Shelves placed 12–18 inches below the ceiling recover that storage without touching the main working zones below. Professional closet designers reference this measurement consistently.
Adjustable hanging systems let rods be repositioned as wardrobe contents change. That’s worth more than it sounds.
A fixed rod placed for shirts in year one becomes a problem when the wardrobe shifts toward dresses or longer pieces. Adjustable systems cost roughly the same and stay useful for years.
| If your hanging clothes currently touch the floor or bunch at the hem, the rod is likely set too low and the space beneath it is wasted. Raise the rod and use the lower zone for a second rod, drawers, or shoe shelving. That one adjustment can recover a full section of usable storage in an average-sized closet. |
Master Closet Ideas That Improve Daily Use
Some additions pay back their cost in time almost immediately. These aren’t luxury upgrades for their own sake. Each one solves a specific daily-use problem.
Adjustable shelving: Fixed shelves stop working the moment storage needs shift. Adjustable systems cost roughly the same and remain useful as the wardrobe changes over years.
Under-shelf LED strips: Overhead lighting alone creates shadow zones on lower shelves and inside drawers. Under-shelf LEDs are a low-cost fix at under $30 for most applications. They eliminate the main reason people can’t find things quickly.
Full-length mirror: Placed on a wall or the back of the door, it removes the round-trip between the closet and the bathroom. A small change that saves several minutes every morning.
Pull-out valet rod: A single rod that extends from the wall for next-day outfit staging. Most are under $20 and require no specialist installation. The difference it makes to a rushed morning is disproportionate to the cost.
Center island: This works in closets at least 11–12 feet wide. It adds drawers for accessories, a surface for folding or planning outfits, and pull-out trays for jewellery. Standard island height is 36 inches. This is a genuine upgrade, not a necessity. In larger closets it transforms the space.
Modular islands start around $2,500. Fully custom builds run $15,000 and up. The right upgrades are the ones that match how the closet gets used daily, not what photographs well in a showroom.
How to Organise a Master Closet Step by Step
The right layout and system are only half the work. How items get returned to the space determines whether the closet holds its shape or reverts to chaos within weeks.
The most common mistake at this stage is putting things back before deciding where they belong.
Step 1: Sort Everything Before It Goes Back In
Nothing goes back into the master closet before it’s been sorted into one of four categories:
- Keep: Worn in the past 12 months, fits correctly
- Donate: Good condition, no longer worn
- Sell: Higher-value items worth listing
- Relocate: Items that belong elsewhere in the home
A useful benchmark: most people wear roughly 20% of their wardrobe around 80% of the time. Knowing that makes the decisions about the other 80% significantly easier.
If you’re working through a larger clear-out at the same time, the same approach I use for cleaning a room from scratch applies here, category first, placement second.
Step 2: Assign Every Zone Before Replacing Items
Once the closet is empty, assign each category to its zone before anything goes back in. Organise by category first, then by colour within each category. That sequence reduces the time spent finding specific items to seconds rather than minutes.
Matching hanger type throughout the closet is one of the easiest visual improvements. Slimline non-slip hangers free up roughly 30% more rod space than standard plastic versions. In a closet where rod space is already limited, that’s meaningful.
Step 3: Place Items by Frequency of Use
Daily shoes at eye level. Frequently worn clothing at mid-rod height. Rarely used items on upper shelves or at rod ends. Seasonal items come out of the active closet entirely.
This structure means the closet requires less thought to use every day. An organised closet doesn’t stay that way because of discipline. It stays that way because the system matches the wardrobe, and every item has a specific place to return to.
The same logic applies when you’re packing for a trip: everything is faster when items are in a consistent, predictable location.
Master Closet Cost: What to Expect at Each Level
Budget is usually the deciding factor, and the range is wider than most people expect. A basic pre-made kit starts under $200. A fully custom build can exceed $20,000.
| System Type | Typical Cost Range | Best For |
| DIY / pre-made kit | $100–$500 | Standard spaces, tighter budgets |
| Semi-custom modular | $2,500–$8,000 | Flexible layouts, mid-range budgets |
| Fully custom-built | $5,000–$20,000+ | Irregular spaces, long-term homes |
Professional installation adds $200–$1,500 in labour on top of system cost, depending on complexity. DIY installation saves that cost but requires accurate measuring, proper wall anchoring, and an honest assessment of the structural situation.
Budget-Friendly Systems Worth Knowing
If the budget is tight, these systems cover most situations without cutting corners on function:
- IKEA PAX: Starts at $380 for a basic combination. Scales well to $1,200+ for larger configurations. The most flexible modular system at this price point.
- Home Depot: Adjustable shelving kits and closet rod systems; good for straightforward standard spaces.
- Lowe’s: Wire and wood DIY systems; lower entry price than IKEA on basic builds.
- ClosetMaid and Rubbermaid: Starter systems for basic organisation. Fine for smaller closets or interim solutions.
- The Container Store (Elfa): More flexible and durable than most modular systems. Frequently discounted during their annual sale.
- Amazon: Best for individual add-ons like shelf dividers, hanging organisers, and fabric bins rather than full systems. Most under $50.
| Note: Prices shown are as of 2026. Check current pricing directly with each retailer before purchasing. |
Mistakes That Make a Master Closet Hard to Use
Most of these problems appear at the planning stage and get fixed cheaply then. After installation, they cost time and money. Here are the ones I see most often:
Planning for the current wardrobe, not the future one: Most people request more storage within a year of completing a build. Plan for the wardrobe it will become, not what it holds today.
Skipping the declutter: Organising around items that don’t belong in the closet means the system works against itself from the first week.
Overcrowding the layout: A closet with no breathing room feels chaotic regardless of how tidy the contents are. Leave intentional open space. It doesn’t read as wasted. It reads as calm.
No per-person zones in a shared closet: Mixing storage without clearly assigned sections is the most consistent source of ongoing disorder in shared wardrobes. One side per person, clearly defined, solves most of it.
Fixed shelving in the wrong positions: Shelves that can’t be adjusted become a problem within months as storage needs shift. Adjustable systems cost the same and stay usable.
Getting these right at the planning stage costs nothing. Fixing them post-installation almost always does. A clear zone plan, adjustable systems, and assigned sides for each user addresses most of what goes wrong in a master closet over time.
Master Closet Design Ideas for Shared Wardrobes
Shared wardrobes have one consistent problem: without clear zones, the closet belongs to neither person and works against both of them. These are the master closet design decisions that make the most difference for two people sharing a space.
Assign sides, not just shelves: One full wall per person, or one half of a double-sided layout. That includes hanging rods, shelving, and floor space. No overlap. The clarity is what makes it sustainable.
Different hanging heights per person: If one person wears mostly shirts and the other mostly dresses, their hanging sections should reflect that. A double-hang configuration on one side and a long-hang on the other is a common combination that uses the available height efficiently.
Shared zones for joint items: Seasonal storage and occasionally used items can occupy the upper shelves shared between both sides. This keeps each person’s main zone clean while still using the full height of the space.
Separate shoe storage: Shared shoe shelving with no clear assignment is where shared closets tend to break down fastest. Even a simple labelling system helps. In larger closets, dedicated shoe towers on each person’s side remove the issue entirely.
A well-planned shared closet works because the structure does the organising, not because both people are trying hard to maintain it.
The layout for your living space has the same principle, you can read more about how I approach laying out a shared living room for a sense of how the same zoning logic applies in a different room.
Frequently Asked Questions
These are the questions I get most often once people have worked through the layout and zone decisions above.
How do you organize a master closet?
Sort everything first. Nothing goes back without being categorised. Then assign zones by item type and place items by frequency of use: daily items at eye level, seasonal storage on the highest shelves. Matching hangers and consistent organisation by colour within each section keeps it manageable long-term.
How do you organize a master bedroom closet for two people?
Assign one side per person, including hanging rods and shelving. Keep different hanging heights to suit each person’s wardrobe. Shared seasonal storage lives on the upper shelves. The clearer the zone assignment, the less daily effort it takes to maintain.
How big should a master closet be?
For a single user, 4×5 feet is the practical minimum for a walk-in. For two people, 7×10 feet gives enough room for per-person zones and comfortable movement. 100 square feet is the point where storage on three walls becomes genuinely comfortable.
What is a good size for a master closet?
7×10 feet works well for most couples. It fits a U-shaped layout with a centre aisle and allows separate zones for each person. Anything smaller than 4×4 feet limits you to a single-sided layout with limited storage for shoes and accessories.
How to design a master closet on a budget?
Start with the IKEA PAX system. It starts at $380 and scales well. Focus the budget on the sections you use most and add accessories like valet rods and under-shelf lighting incrementally. A modular system beats a fixed kit because it adjusts as your wardrobe changes.
How big is a master closet in most homes?
Builder-standard master closets typically run 5×7 to 6×8 feet. That’s functional for one person with a standard wardrobe, but tight for two. If the space allows any modification, bringing it to at least 7×10 feet makes a real difference for shared use.
How to organize master closet when you have too many clothes?
Declutter before organising. This is the step most people skip. Use the 12-month rule: if you haven’t worn it in a year and it doesn’t fit, it doesn’t go back in. Then assign zones strictly by category. Overcrowded closets almost always contain items that belong elsewhere.
Final Verdict
If you’re working with a space under 6×8 feet, a well-planned DIY system using IKEA PAX or a similar modular approach covers most situations and costs under $1,000 installed.
If you’re sharing the closet with a partner, the single most effective change you can make before spending any money is assigning one side per person. That decision alone resolves most shared closet problems.
For larger spaces at 7×10 feet or above, a semi-custom modular system gives you the flexibility to match the layout to the actual wardrobe, and it holds up over time as needs change.
The U-shaped layout with separate zones per person is what I’d use in that situation. Measure the space first, map the zones for your specific wardrobe before ordering anything, and place the most-used items at the most accessible level. The rest follows from that.