

Denim was considered a fashion crime for years, and yet here we are, still wearing jeans every single day without question. They are the most-worn item in my wardrobe and the last thing I am willing to replace over a tear.
Of course, you go and buy a new pair of jeans, but how many times are you willing to do that? You can’t take the easy way out because a crotch rip or a knee hole is a fixable problem, not a shopping trigger.
Once you learn how to patch jeans’ crotch and knees tears properly, you stop seeing damage as the end of a pair and start seeing it as a ten-minute repair job.
Go ahead and find out how to patch a crotch or knee tear with simple stitching and patching methods.
What Patching Jeans Actually Means and When to Do It?
Patching jeans means reinforcing a damaged or thinning area by adding fabric either behind or over the weak spot. The patch supports the surrounding denim, prevents the tear from spreading, and restores structural strength to the area. What most people get wrong is waiting too long.
By the time a hole is large, and the fabric around it is already frayed and fragile, a patch has much less to grip onto, and the repair will not hold. Patching works best on early damage, a thinning section of denim, a small hole just starting to form, or edges beginning to fray.
The earlier you catch it, the longer the fix holds. Keep an eye on high-stress spots like the inner thigh, the crotch seam, and the knees, since these areas wear down faster than anywhere else on the fabric.
Why Jeans Tear at the Knees?
Knee tears are one of the most common denim repairs, and in my experience, they catch you off guard every single time. The knee area flexes constantly; every time you sit, crouch, climb stairs, or kneel, the fabric folds and stretches at the same point.
Over time, this repetitive stress weakens the weave. Fitted or slim-cut jeans speed up this process because the fabric has less give, meaning all that movement gets absorbed by a smaller surface area.
Active lifestyles, physical jobs, and habits like kneeling on hard floors all accelerate the damage. What starts as a small thin patch or a frayed horizontal line can split wide open within days if the denim around it is already fragile. The earlier you spot that thinning, the easier the fix.
Step-by-Step Guide on How to Patch Jeans at The Knees
Before you start, gather everything in one place so the repair goes smoothly. Getting your materials ready first saves time and keeps the process clean from start to finish.
Materials needed:
- Denim scrap or patch larger than the tear
- Strong polyester thread
- Sharp scissor
- Pins or clips
- Chalk or crayon
- A needle or sewing machine
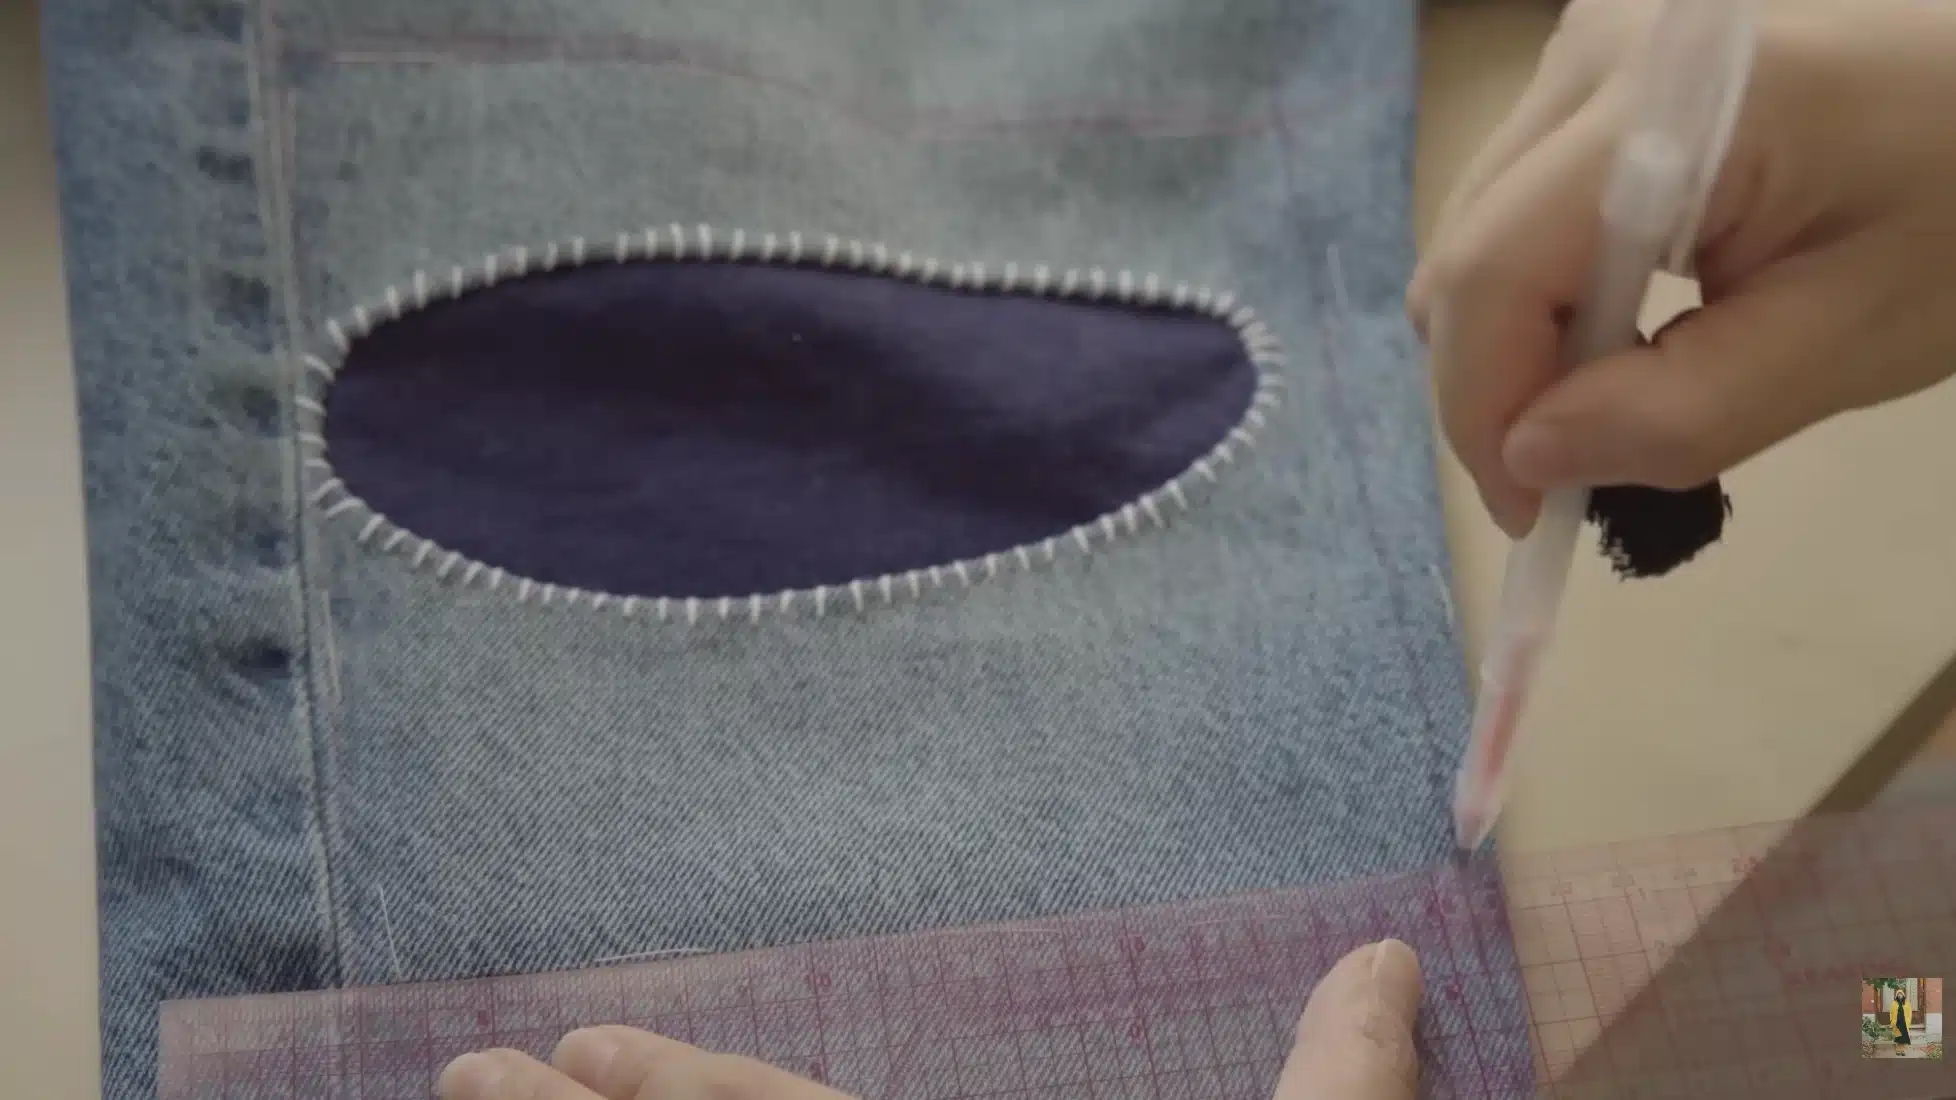
Step 1: Assess the Damage and Prepare the Patch

Start by checking the hole and trimming loose threads around it. Run your fingers over the fabric to feel where the denim is thin.
Mark the weak area and extend the line about 2–3 cm into stronger fabric so the repair holds longer. Cut a sturdy patch from linen or cotton, align it with the marked area, and secure it with safety pins before stitching.
Step 2: Attach the Patch with Whipstitches

Place a notebook between the jean layers so your needle doesn’t catch the other side. Begin with small anchor stitches about 1 cm from the edge.
Work around the patch using whipstitches, keeping each stitch about half a centimeter apart. You’ll notice this method keeps the patch tight and clean, while giving your repair a strong outer hold.
Step 3: Seal the Patch with Sashiko Running Stitches
Fold the patch edges neatly and secure them with basting stitches. Mark a new line about 5 mm below the original edge so your needle catches the folded layers.
Stitch along the square using Sashiko running stitches, which create a clean frame around the patch. As you sew, your repair becomes both stable and flexible, helping the denim move naturally.
Step 4: Add Sashiko Details for Strength and Style
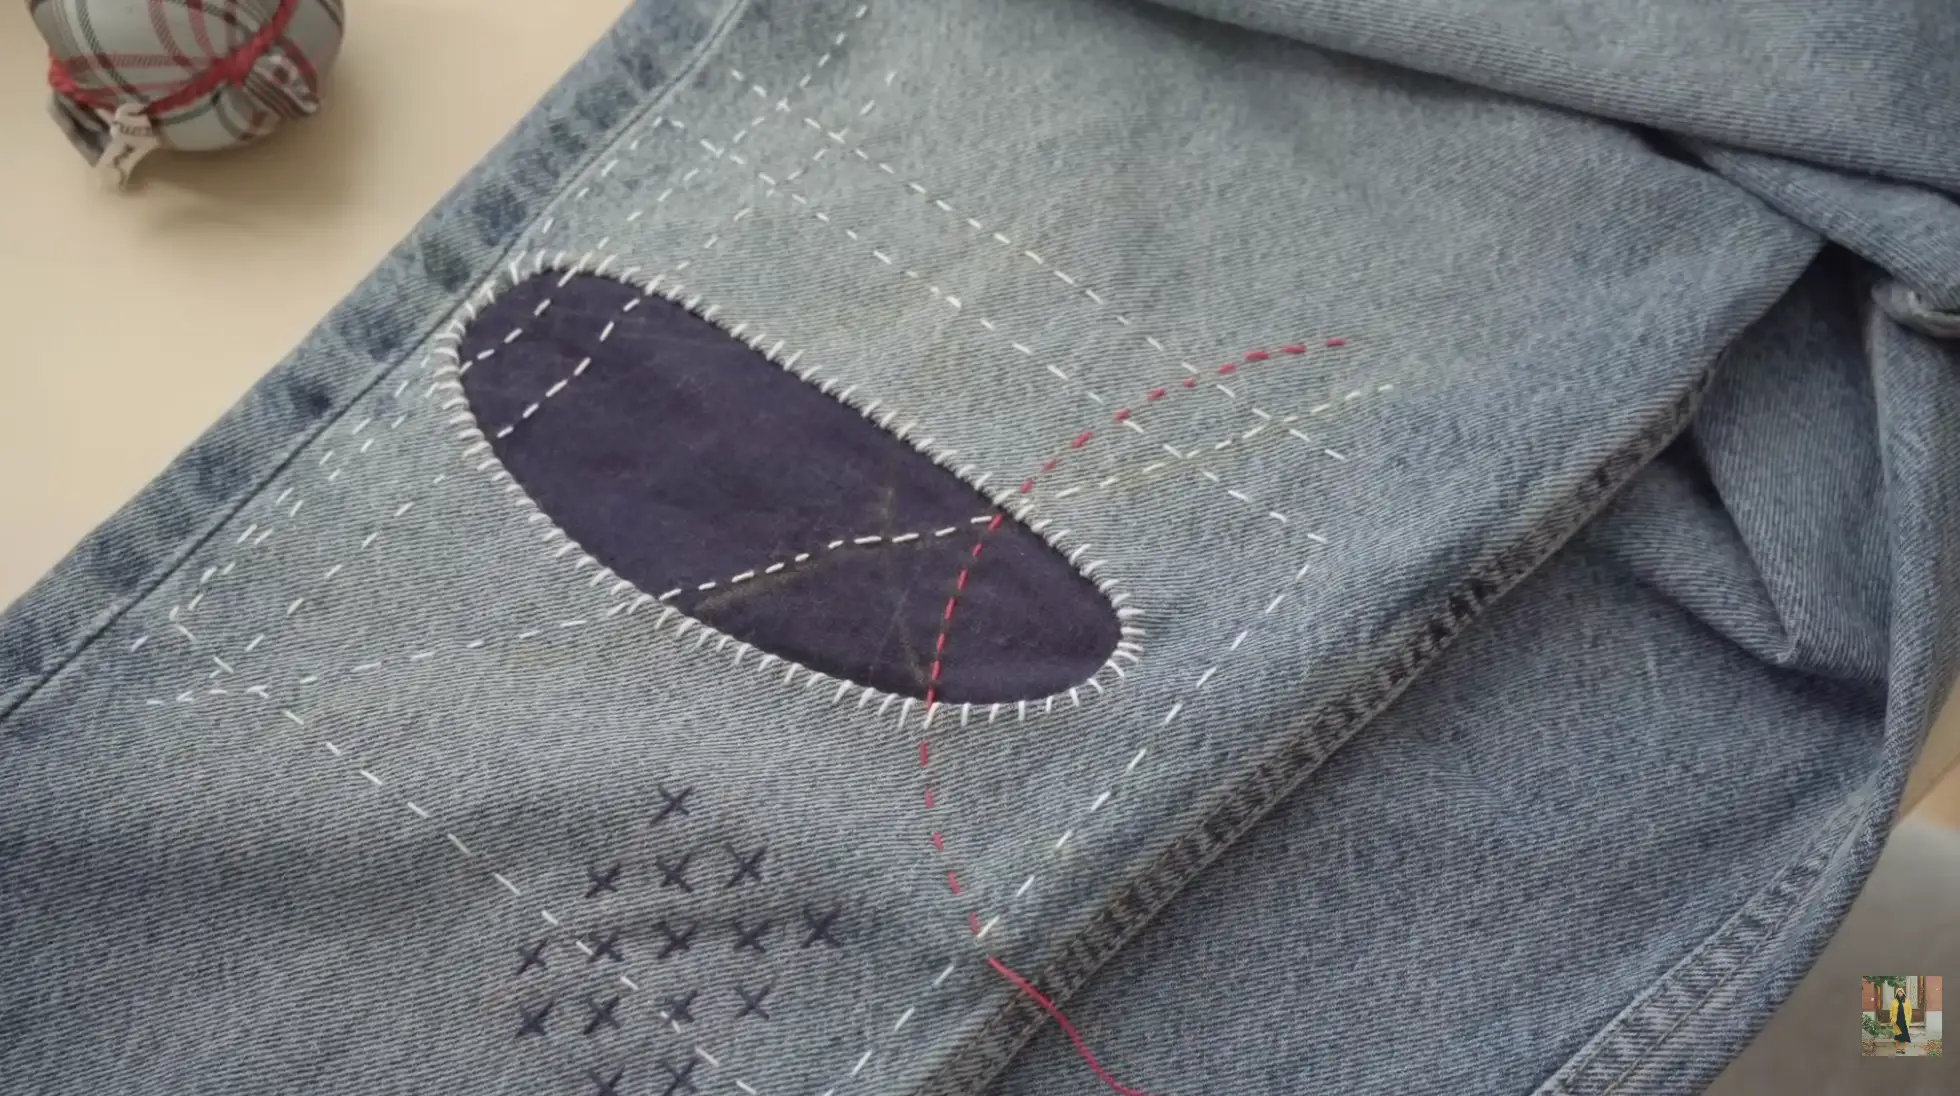
Draw a small 1 cm grid across the patch and stitch simple cross patterns following the lines. This hitomezashi pattern strengthens the repair and adds character.
Continue with vertical and horizontal stitches, then reinforce nearby thin areas with back stitches or diagonal stitches. By the end, your jeans feel stronger, and your patch carries a hand-stitched design.
Step 5: Show the Finished Repair and Check It
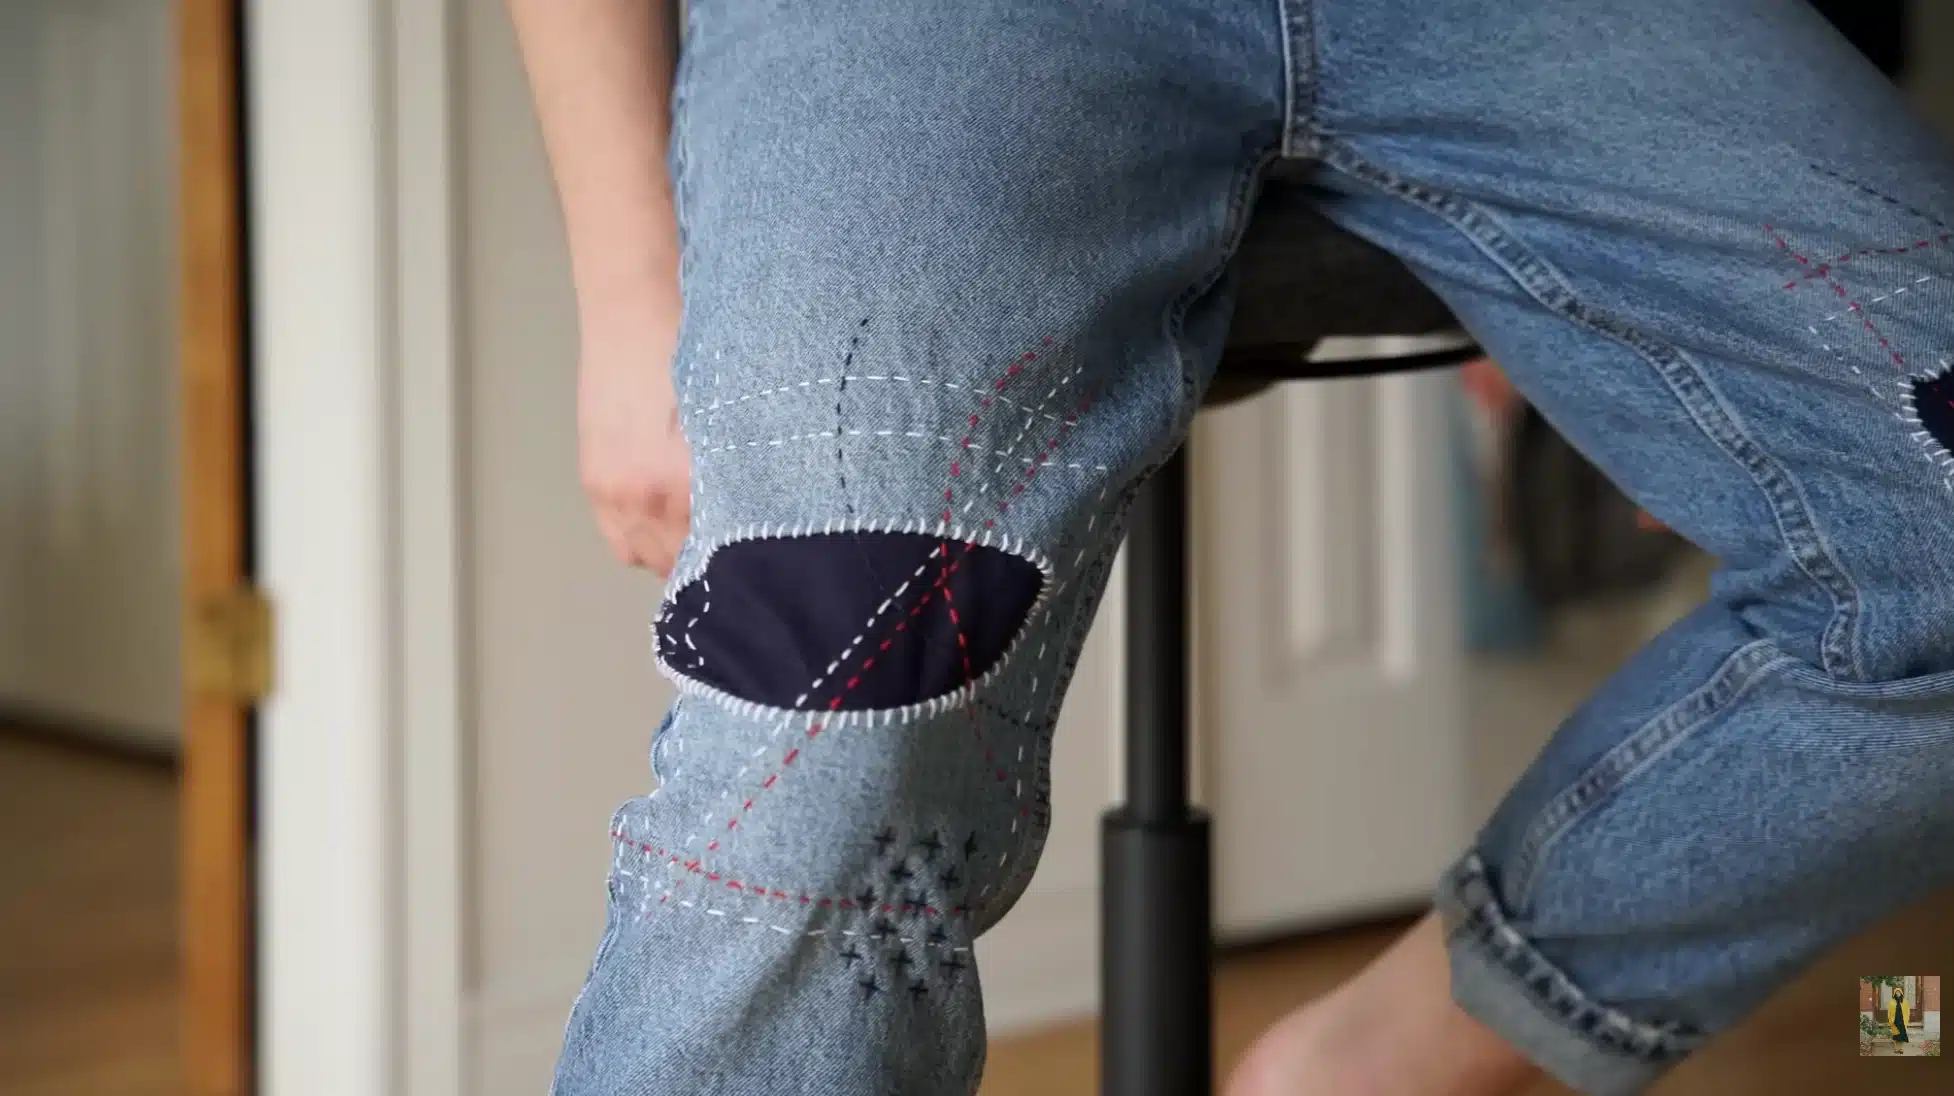
Turn your jeans right-side out and smooth the knee area flat. Hold it up in good light so you can see how the patch sits under the denim.
Gently bend the knee area a few times to make sure the stitches don’t pull. If you spot lifting, add a few reinforcement stitches. End with a clear “after” photo showing the finished patch.
Refer to the video for a detailed explanation:
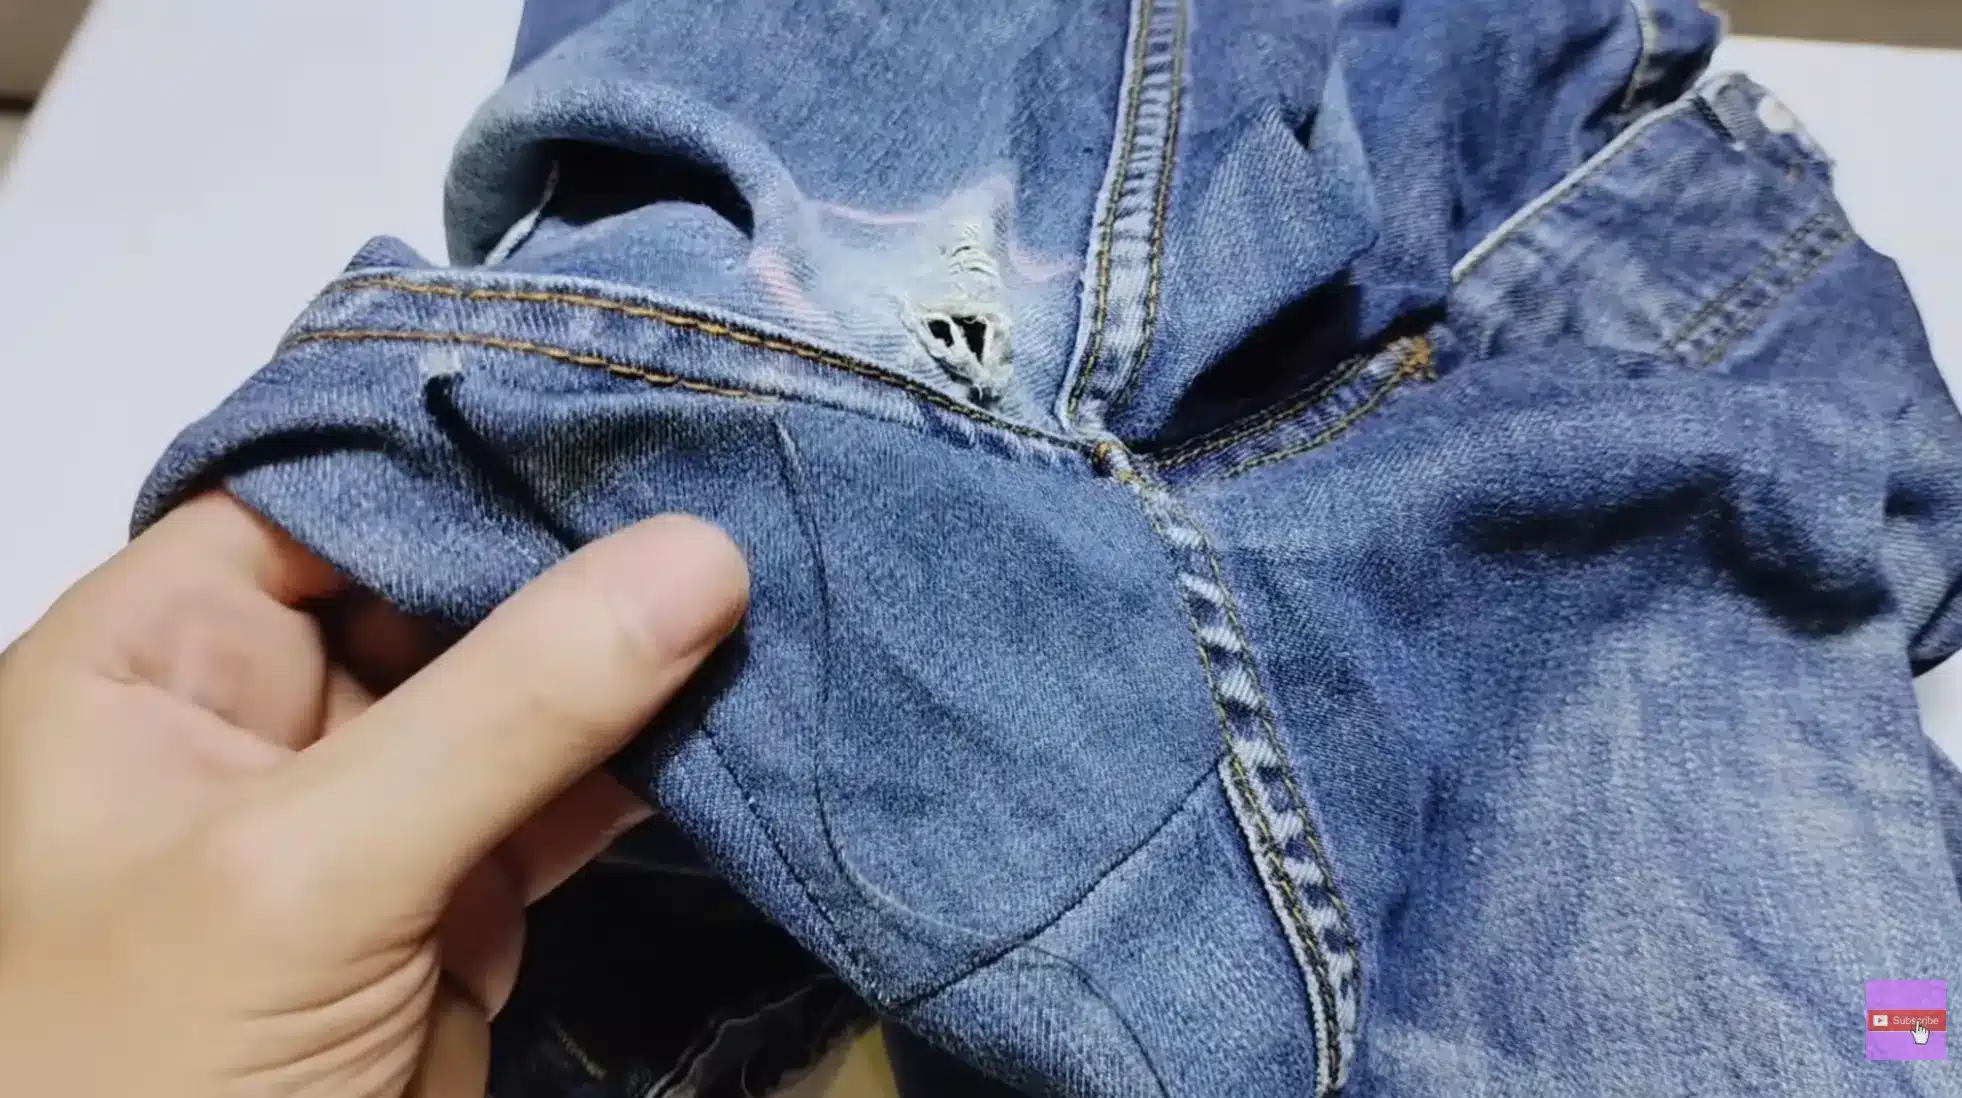
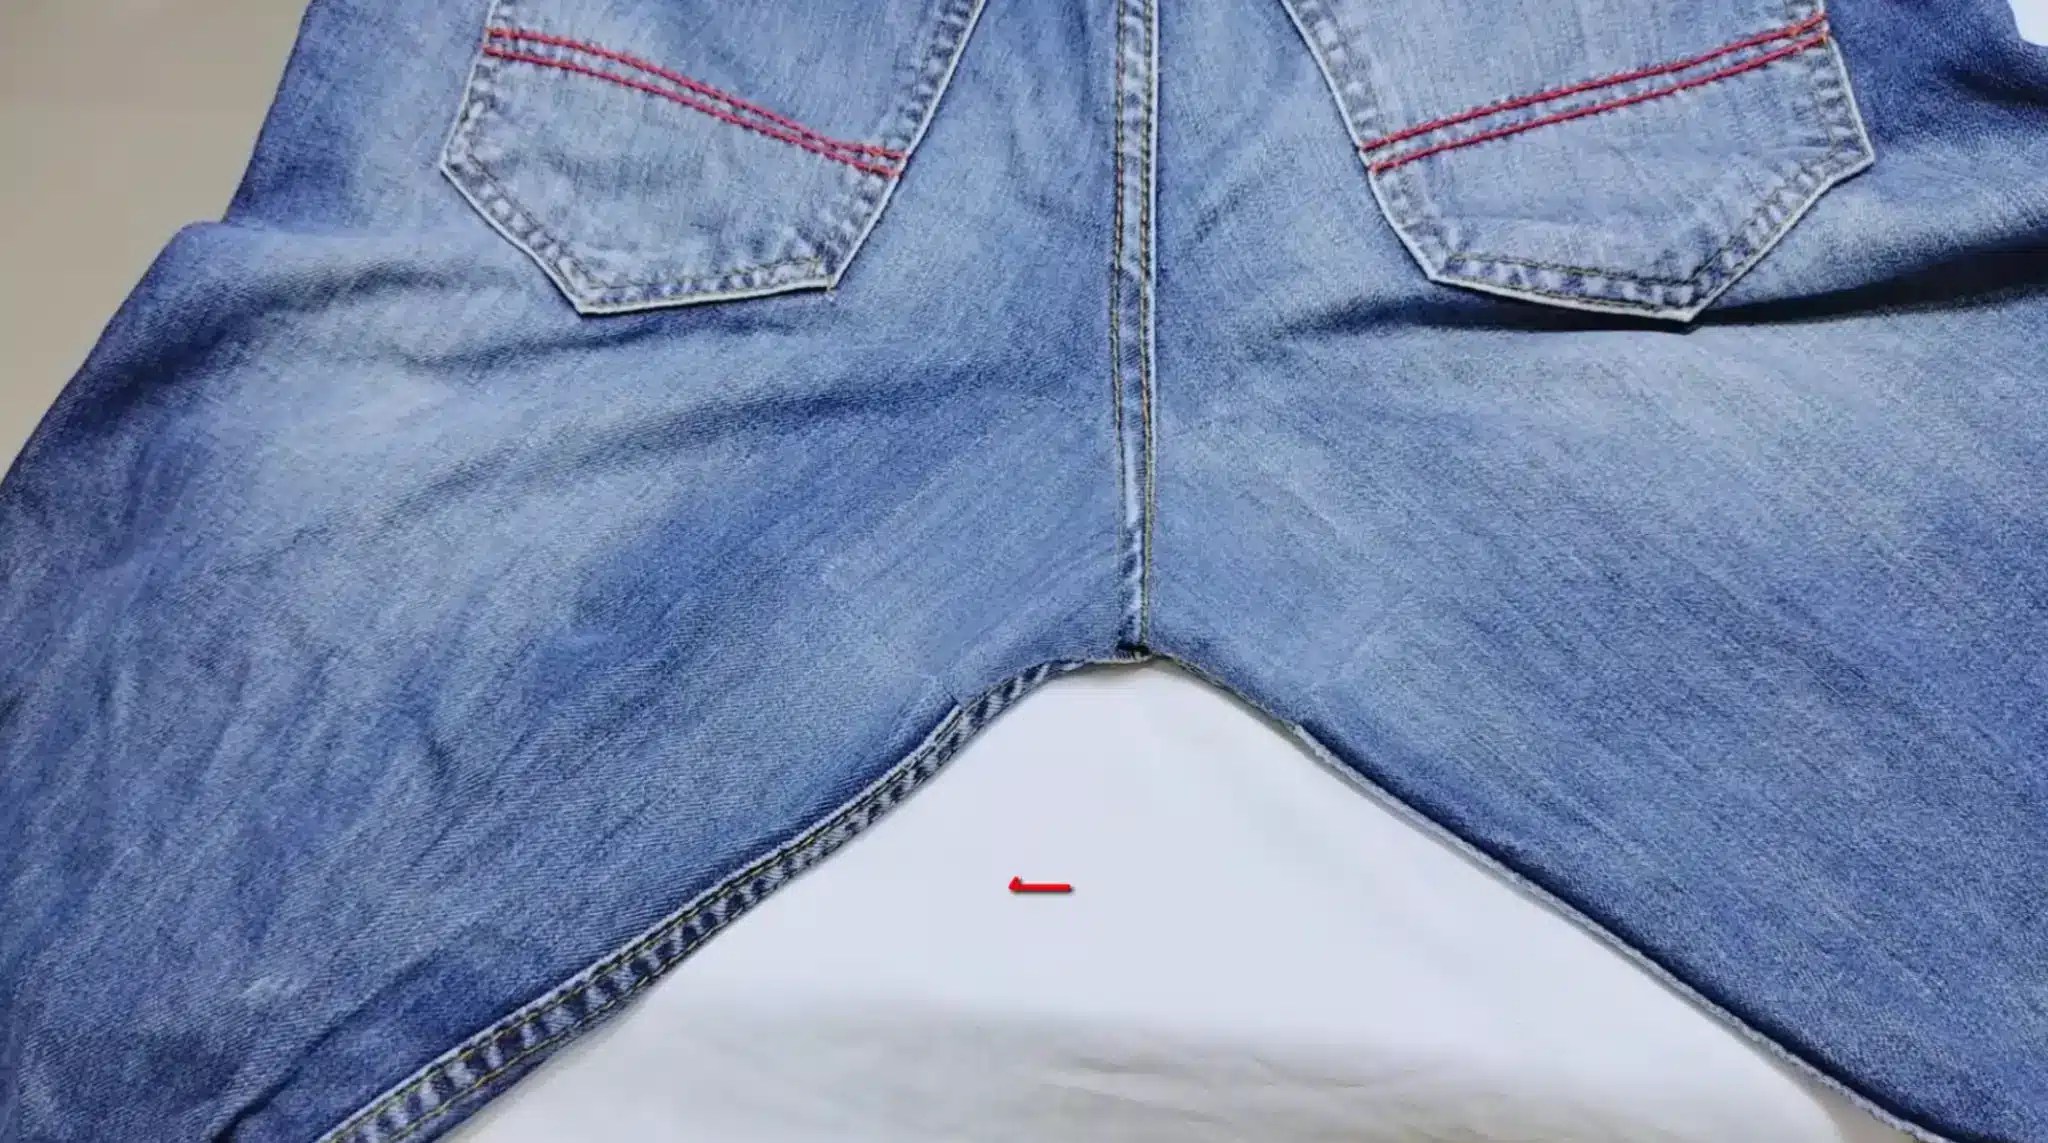
Why Do Jeans Rip in The Crotch?
The crotch is the most high-stress zone on any pair of jeans, and my most-worn pairs always go here first. Every time you walk, sit, or stand, the fabric in this area is being pulled in multiple directions simultaneously.
Unlike the knee, the crotch never really gets a break; it is under constant friction and tension throughout the entire day. Fitted jeans make this worse because the fabric has less room to distribute that stress, so it concentrates in one small zone.
The weave thins out gradually, often first showing as color fading or a slightly papery texture before any hole appears.
By the time a visible tear forms, the fabric around it is usually already weakened. Catching it at the fading stage is always the smarter move.
Step-by-Step Guide on How to Patch a Jeans Crotch
Crotch repairs need a more careful approach than knee patches, and your material choices matter more here than anywhere else.
Getting the right patch fabric and thread before you start makes the difference between a repair that lasts and one that comes apart in a week.
Materials needed:
- Medium-weight denim scrap
- Strong polyester thread
- Sharp scissors, pins
- A needle or sewing machine
- A small amount of elastane(optional)
Step 1: Identify the Worn Area and Gather Materials
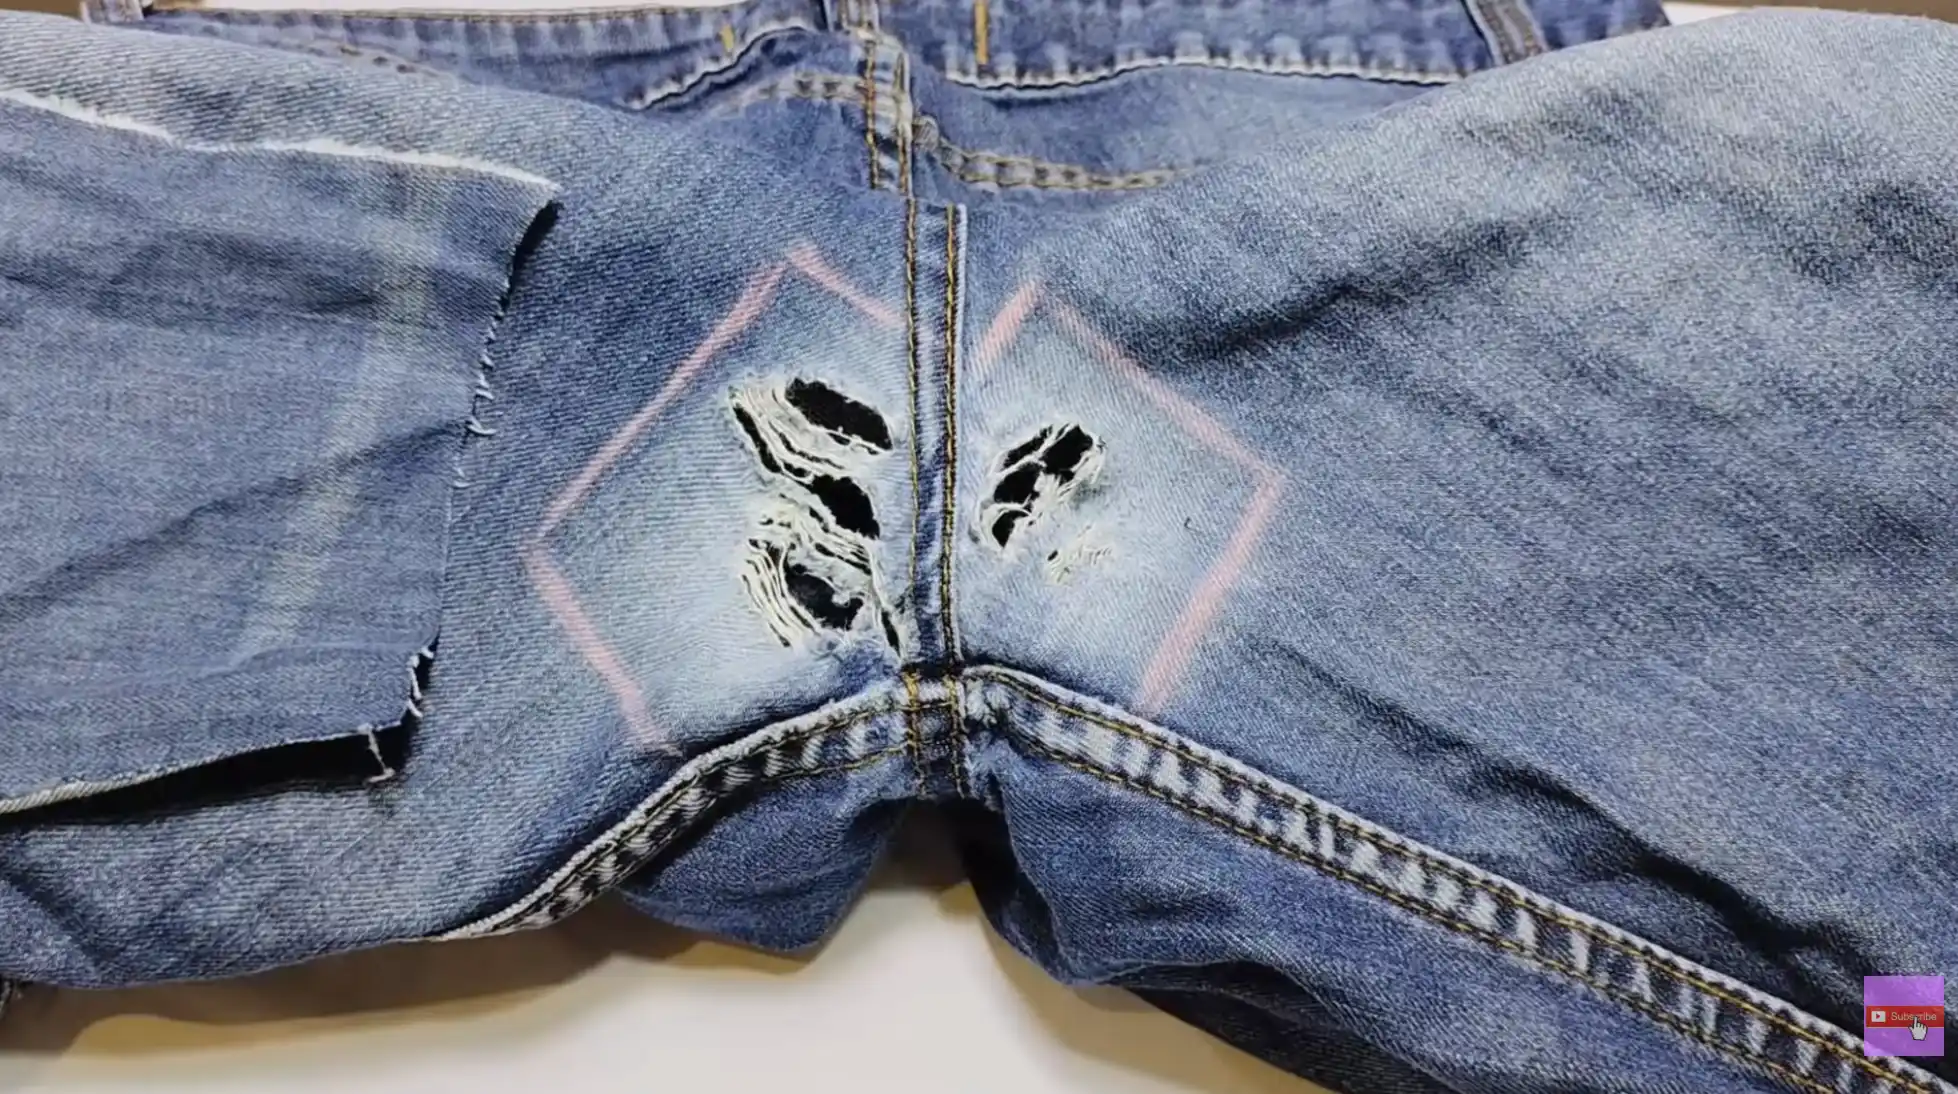
Start by closely checking the worn or torn area of your jeans. Look for places where the fabric has thinned or separated.
Choose a denim piece with a similar color and weight so the repair blends well. Use a strong thread, thicker than regular sewing thread, along with a size 7 needle to handle heavy denim fabric.
Step 2: Sew the Repair Using a Front Stitch
Place the patch fabric carefully behind the damaged area. Begin sewing with a front stitch, which works well for denim reinforcement.
Keep your stitches even and close together so the repair stays strong. This stitch helps secure the patch firmly while keeping the repair fairly subtle and durable during everyday wear.
Step 3: Trim and Clean the Damaged Fabric
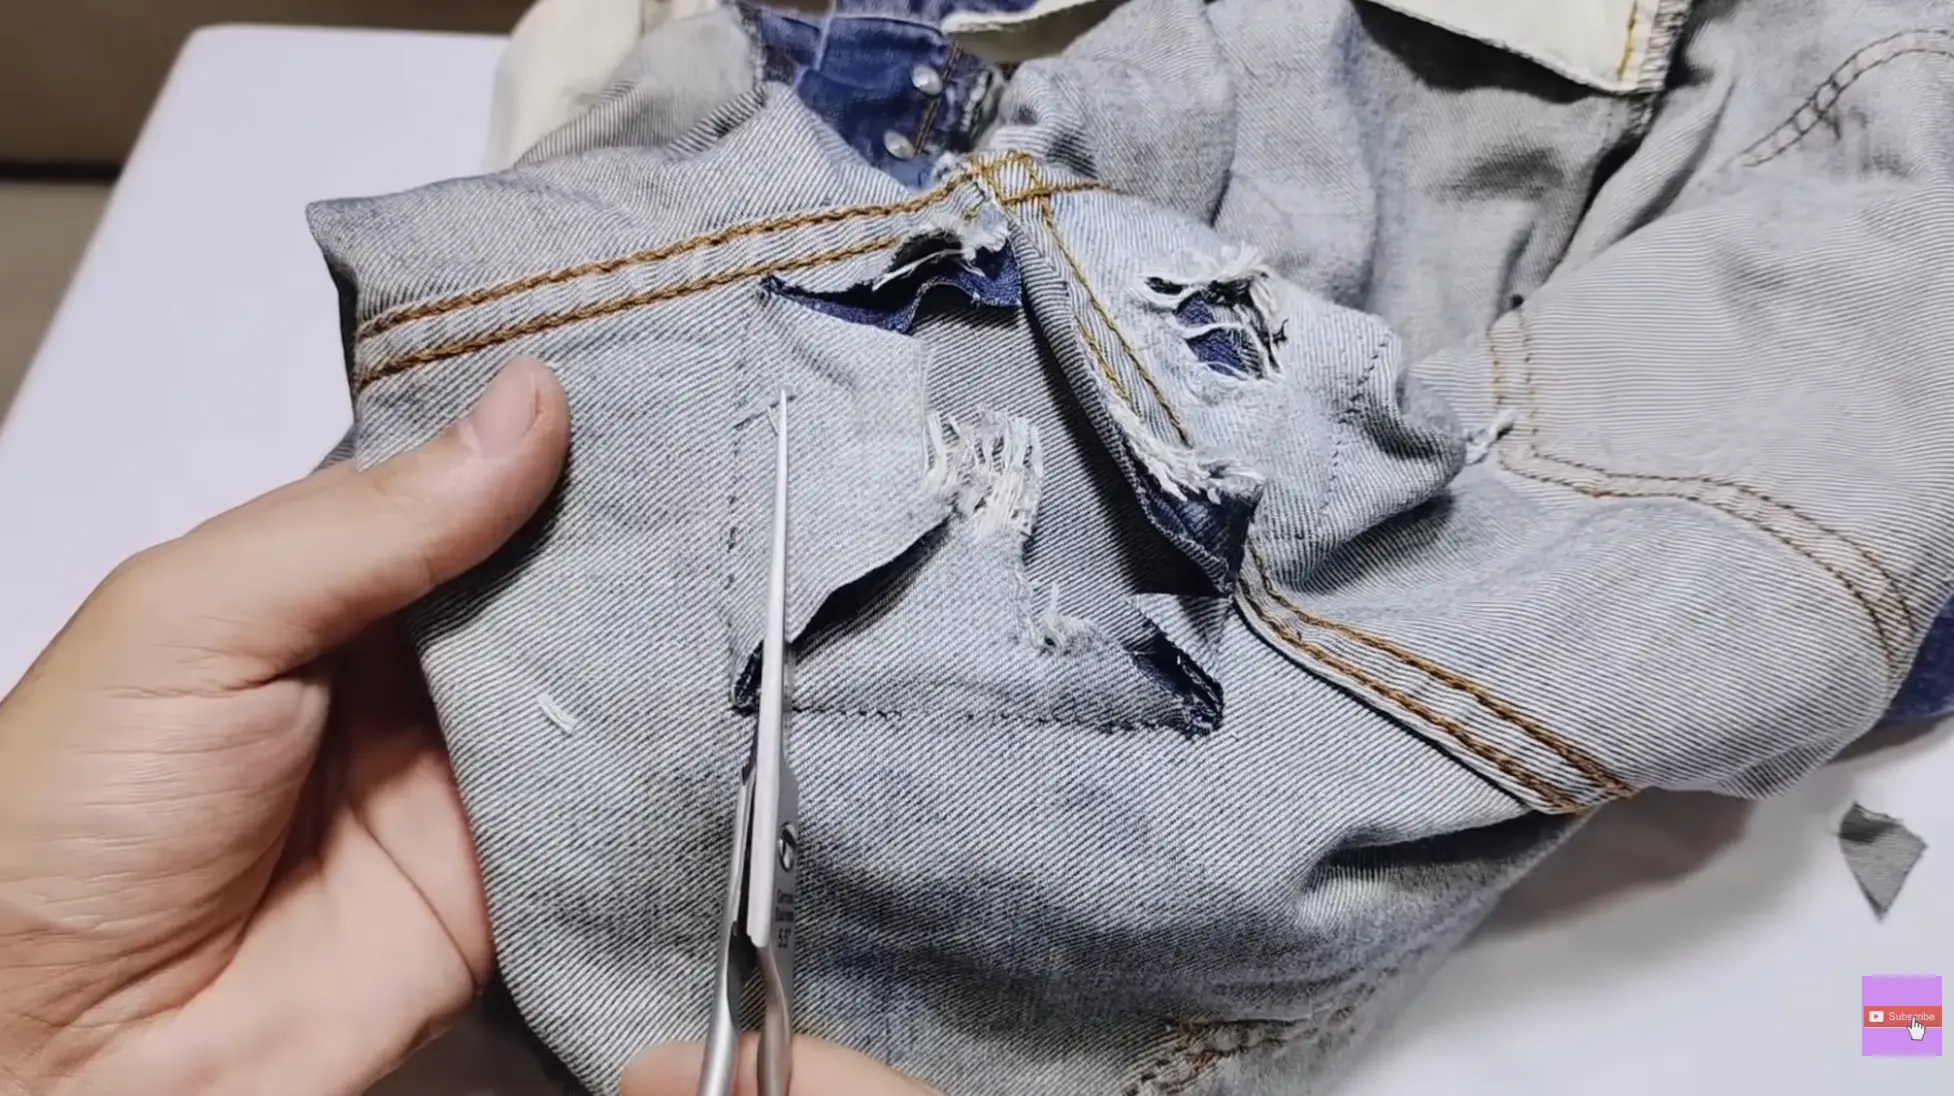
Before finishing the repair, clean the inside of the damaged area. Carefully remove loose threads and weak fabric that could weaken the patch later.
Trim the corners of extra cloth so the repair lays flat. Work slowly with scissors and avoid cutting into the surrounding healthy denim, which needs to support the stitches.
Step 4: Reinforce the Patch with Heat Adhesive

Place a small reinforcement pad or fabric support behind the repair area. Press it with a hot iron to activate the adhesive.
Add a piece of sticky reinforcing cloth on the inside and heat it again so it bonds firmly with the denim. This step strengthens the repair and helps the patch stay secure through regular use.
Step 5: Show the Finished Repair and Do a Wear Test
Flip the jeans right-side out and press the crotch area flat with your hands. Take a close “after” photo, then a wider shot so your reader sees placement.
Next, do a quick test by stretching the area side to side and front to back. If anything shifts, add more secure stitching. Finish with a final photo of the completed repair.
Refer to the video for a detailed explanation:
Methods You Can Use to Patch Jeans at Home
Not every repair needs the same approach, and the method that works best depends on where the damage is and how permanent you need the fix to be. Here is a quick breakdown of your main options:
| Method | Best For | What You Need | Notes |
| Inside patch | Crotch, thighs, knees | Needle or machine + patch | Strongest everyday fix |
| Outside patch | Large holes | Needle + patch | Visible repair style |
| Darning | Small holes, thin denim | Needle or machine | No patch needed |
| Iron-on patch | Quick repair | Iron + patch | Better if stitched too |
| Fabric glue patch | Emergency fix | Fabric glue + patch | Short-term hold only |
Each method has its place; my go-to is always the inside patch for anything structural, but a well-placed outside patch can look completely intentional when done with care.
How to Get Creative With Your Patchwork
Patching does not have to look like a repair, and some of my favorite pairs of jeans now have patches that look better than the original denim ever did.
Once you get comfortable with the basic stitch-and-hold technique, you can start playing with contrasting fabrics, visible embroidery, printed denim scraps, and decorative stitching patterns over outside patches.
Floral fabric patches on knee tears, bold geometric shapes on the thigh, or colored thread running in diagonal lines across a crotch repair, all of these take a fix and make it a feature. You do not need extra tools for this.
The same needle, thread, and patch fabric you already have is enough to get creative. Pick a scrap with a print or texture you like, position it on the outside, and stitch with a contrasting thread color.
The result is a pair of jeans that looks personal and considered rather than worn out.
Tears vs. Holes in Jeans: What Is the Difference and How to Fix Each
Understanding whether you have a tear or a hole changes your entire approach, and in my experience, getting this distinction right is what makes the repair actually last. Here’s a clear comparison:
| Factor | Tears | Holes |
| What it is | Fabric split, denim separated but still intact on both sides | Missing fabric, a section worn away completely, leaving a gap |
| How it looks | A clean or ragged line through the denim | An open gap with no fabric to stitch back together |
| Best fix | Close the split with tight stitching, then back-reinforce | Inside patch essential, stitching alone has nothing to grip |
| Patch needed? | Optional but recommended for added durability | Always required, no exceptions |
| Stitch type | Short straight stitch or backstitch along the split | Zigzag or parallel stitch lines across the full patch |
| Key watch-out | Stitch before it spreads into a full hole | Extend the patch and stitching well past the weak surrounding denim |
The method should always follow the damage type first; tears need closing, holes need filling. Matching your fix to what you actually have is what keeps the repair holding through daily wear.
Common Mistakes That Make Patches Fail
Most failed patches come down to the same handful of avoidable errors, and skipping even one step in the process can undo an otherwise solid repair job. Here is what you must avoid:
- The patch is too small: it must cover the full weak area, not just the visible hole
- Stitching only around the hole: stitches need to extend into strong, healthy denim on all sides
- Wrong patch fabric: thin, stretchy, or low-weight material will not hold up under daily friction
- Skipping the second row on crotch repairs: one row of stitching is never enough for this area
- Repairing fabric that is already falling apart: if the denim around the hole is shredding, a patch has nothing solid to anchor to
Getting the basics right the first time means the repair lasts through real daily wear instead of coming apart after a few washes.
Final Thoughts
Most jeans can be brought back from what looks like the end of their life with the right patch, the right fabric, and a bit of careful stitching.
My personal rule is to check high-wear areas every few washes; catching a thinning spot early saves a lot of effort compared to dealing with a full split later.
The crotch and inner thigh are worth watching first, since those go before anything else in my experience. Once you complete your first successful repair, the process becomes second nature.
You will start seeing potential in pairs you would have thrown out once you learn how to patch jeans, and that shift is genuinely satisfying. Drop a comment below and share your rendition of patching in jeans.