
That dull ache in your lower back that follows you through the day — through work, errands, and even rest- is more common than you think, and more fixable than it feels.
I’ve watched so many people resign themselves to it, not realizing how much gentle yoga can help. Here, you’ll find the best yoga poses for back pain that you can safely do at home.
You’ll learn exactly how each pose works, how long to hold it, and how to avoid common mistakes.
A simple step-by-step routine is included to guide you through the process. By the end, you’ll have a clear plan to ease tight muscles and support your lower back naturally.
Why Yoga Helps Reduce Lower Back Pain
Yoga helps your lower back in a simple but powerful way. When you stretch gently, tight muscles around your hips and spine begin to loosen.
I’ve noticed that even a few slow movements can reduce stiffness after long hours of sitting. Yoga also strengthens your core and glutes, which are the muscles that support your spine every day.
When these muscles are stronger, your lower back does not have to work as hard. Deep breathing during yoga helps calm your nervous system and release built-up tension.
Since back pain often stems from poor posture, weak muscles, or excessive sitting, yoga targets the root causes directly.
Best Yoga Poses for Back Pain Relief
These yoga poses form a gentle sequence you can follow at home. Move slowly, breathe deeply, and focus on control rather than flexibility.
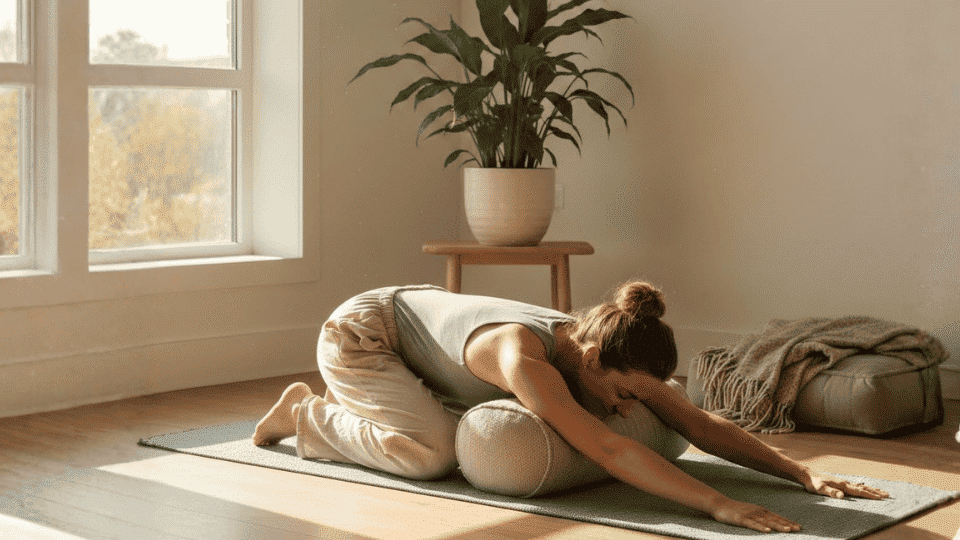
1. Child’s Pose
Child’s Pose is a gentle resting stretch that relaxes your lower back and hips. It reduces spinal pressure and eases overall tension through slow, controlled breathing.
This pose is especially helpful for those who spend long hours sitting, as it targets the muscles that tighten the most throughout the day. It is safe for beginners and a great way to start any back pain relief sequence. Here is how to do it:
- Step 1: Kneel on the floor with your big toes touching and sit back gently on your heels.
- Step 2: Lower your chest toward the floor and stretch both arms forward as far as feels comfortable.
- Step 3: Rest your forehead on your hand and hold for 30 to 60 seconds, breathing slowly and deeply.
2. Cat-Cow Stretch
Cat-Cow is a slow, steady movement that warms up your spine and helps ease stiffness. I like using it when my back feels tight after sleeping or sitting too long.
It gently moves your spine through flexion and extension, improving mobility and helping your body feel more awake and balanced before deeper stretches. Follow these steps to do it correctly:
- Step 1: Start on your hands and knees with your wrists under your shoulders and knees under your hips.
- Step 2: Inhale, drop your belly toward the floor, and lift your chest and tailbone slightly.
- Step 3: Exhale, round your back upward, and tuck your chin toward your chest. Repeat slowly for 8 to 10 rounds.
3. Downward-Facing Dog
Downward-Facing Dog stretches the entire back of your body, from your shoulders down to your calves. It is often used when your legs feel tight because stiff hamstrings can pull on my lower back.
This pose helps lengthen those muscles while also giving your spine space to reset and feel lighter. Here is how to practice it properly:
- Step 1: Begin on your hands and knees with your palms spread firmly on the floor.
- Step 2: Lift your hips upward and start to straighten your legs as much as feels comfortable.
- Step 3: Press your hands into the ground, relax your head, and hold for 20 to 30 seconds.
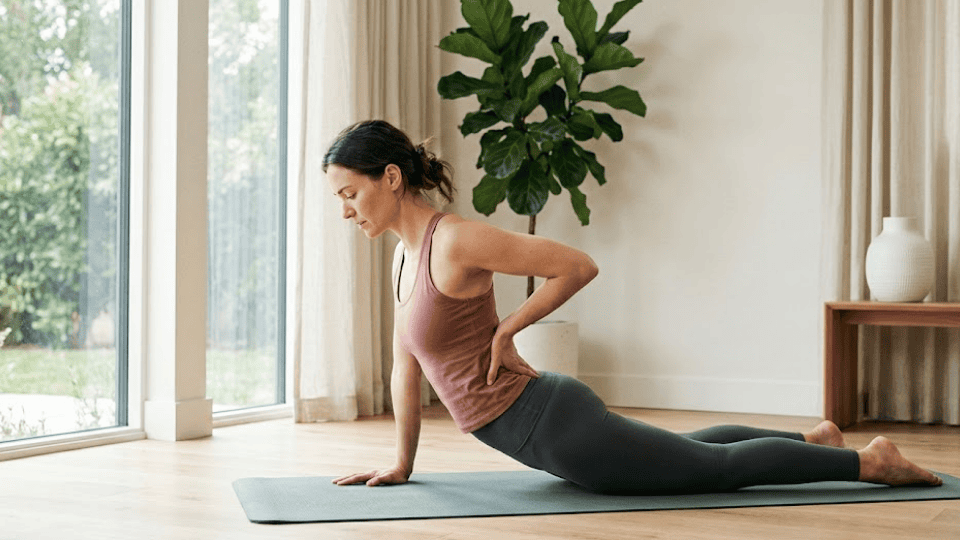
4. Cobra Pose
Cobra Pose is a gentle backbend that focuses on building strength along your spine. I like this one because it supports your lower back rather than just stretching it.
When your back muscles grow stronger, everyday movements like standing and lifting feel more stable and controlled. It is simple but very effective when done with care. Follow these steps to do it correctly:
- Step 1: Lie on your stomach with your legs extended behind you.
- Step 2: Place your hands under your shoulders and press lightly into your palms.
- Step 3: Lift your chest off the floor while keeping your elbows slightly bent. Hold for 15 to 20 seconds.
5. Bridge Pose
Bridge Pose strengthens the muscles that protect your lower back, especially your glutes and core. I’ve noticed that when these muscles are active, your spine does not feel overworked during daily tasks.
This pose also helps improve hip stability, which plays a big role in keeping your lower back comfortable and well supported. Here is how to do it:
- Step 1: Lie on your back with your knees bent and feet flat on the floor.
- Step 2: Keep your feet hip-width apart and press firmly through your heels.
- Step 3: Lift your hips upward and hold for 20 to 30 seconds, then lower slowly.
6. Supine Spinal Twist
Supine Spinal Twist is a calming stretch that gently rotates your lower back and hips, making it an ideal pose to save for the end of a sequence after stronger poses.
The slow twist releases built-up tightness and improves movement in your lower spine without putting pressure on sensitive areas. Follow these steps to do it correctly:
- Step 1: Lie flat on your back and bend one knee toward your chest.
- Step 2: Guide that knee across your body while extending the opposite arm outward.
- Step 3: Keep both shoulders resting on the floor and hold for 30 to 60 seconds on each side.
7. Knees-to-Chest Pose
Knees-to-Chest Pose is a gentle stretch that helps relieve pressure in your lower spine. You can use it after a long day when your back feels tight or compressed.
This simple movement softly rounds your lower back, allowing tense muscles to relax and your spine to feel less loaded. It is calm, steady, and easy for most people to practice. Use these steps to get it right:
- Step 1: Lie on your back and bend both knees toward your chest.
- Step 2: Wrap your arms around your legs and gently pull your knees closer.
- Step 3: Keep your head relaxed on the floor and hold for 30 to 45 seconds.
8. Sphinx Pose
Sphinx Pose is a mild backbend that feels steady and supported. If Cobra feels too strong for you, this is a good option that still builds strength.
I often suggest it when you want gentle activation without pushing too far. It keeps your lower back engaged while staying controlled and comfortable. Here is how to do it:
- Step 1: Lie on your stomach with your legs extended behind you.
- Step 2: Place your forearms on the floor with your elbows under your shoulders.
- Step 3: Press lightly into your forearms, lift your chest gently, and hold for 20 to 30 seconds.
9. Seated Forward Fold
Seated Forward Fold stretches the back of your legs and supports better movement in your lower spine. I have seen how tight hamstrings can add extra strain to your back over time.
This stretch helps reduce that tension while improving flexibility in your hips and legs. When done slowly, it feels steady and controlled. Here is how to practice it properly:
- Step 1: Sit with your legs extended forward and keep your spine tall.
- Step 2: Bend slightly at your hips and reach toward your feet.
- Step 3: Keep your knees slightly bent if needed and hold for 30 to 45 seconds.
15-Minute Yoga Routine for Lower Back Pain
If your lower back feels tight or tired, this quick routine can help. You’ll move gently, build support, and finish feeling more relaxed.
| Time | Pose | What You’ll Do | Purpose |
|---|---|---|---|
| 2 minutes | Cat-Cow | Move slowly between arching and rounding your back | Warm up your spine and improve mobility |
| 1 minute | Child’s Pose | Sit back on your heels and stretch your arms forward | Relax your lower back and hips |
| 1 minute | Downward Dog | Lift your hips up and lengthen your legs | Stretch hamstrings and decompress spine |
| 1 minute | Cobra or Sphinx | Lift your chest gently from the floor | Strengthen and support your lower back |
| 1 minute | Bridge Pose | Lift hips while feet stay grounded | Activate glutes and protect your spine |
| 2 minutes | Supine Spinal Twist | Twist gently on each side (1 minute per side) | Release tension and improve mobility |
| 1 minute | Knees-to-Chest | Hug your knees toward your chest | Ease pressure in your lower spine |
| 2 minutes | Seated Forward Fold | Fold forward with legs extended | Stretch hamstrings and reduce back strain |
| 4 minutes | Final Rest (Lie Flat) | Rest on your back and breathe slowly | Allow your spine to fully relax |
If you stay steady and move with control, this routine fits neatly into 15 minutes. I always remind you to go slow, breathe deeply, and stop if anything feels sharp or painful.
Common Mistakes That Can Worsen Back Pain During Yoga
When you practice yoga for back pain, small errors can slow your progress. I’ve seen how simple habits can quietly increase strain rather than provide relief.
- Forcing a deeper stretch too soon: If you push past mild discomfort, your muscles tighten to protect you. That tension can increase pressure on your lower back rather than ease it.
- Holding your breath during poses: When you forget to breathe slowly and evenly, your body stays tense. Steady breathing helps your muscles relax and supports safer movement.
- Skipping a proper warm-up: Moving straight into strong stretches without warming up leaves your spine stiff. Gentle movements first help your joints prepare for deeper poses.
- Ignoring proper alignment: Letting your lower back round too much or your hips twist unevenly adds strain. Small alignment adjustments can protect your spine from extra stress.
- Moving too quickly between poses: Rushing transitions reduces control and stability. Slow, steady movement keeps your muscles engaged and lowers the risk of sudden strain.
When you stay patient and focused, yoga can support your recovery. I always remind you to move gently and listen closely to your body.
How Often to Do Yoga for Back Pain Relief
Doing yoga for back pain works best when you stay consistent rather than push too hard. I’ve seen how steady practice helps your back improve without feeling strained or overwhelmed.
If you’re just starting, aim for three sessions per week, keeping each one around 15 to 20 minutes. This gives your muscles time to adjust without overworking them.
Many people notice small changes in flexibility and less stiffness within two to three weeks. As your body feels stronger, you can increase to 4 or 5 days per week.
Pick specific days and times so it becomes routine. Stay patient, move gently, and let progress build gradually.
Final Words
So, back pain doesn’t have to be something you just live with. The best yoga poses for back pain don’t need to be complicated; just consistent and controlled. What matters most is showing up regularly and giving your body the movement it needs.
These nine poses work together to stretch tight areas and strengthen the muscles that protect your spine. Practiced as a short routine, they become even more effective over time.
Each pose builds on the last, making the sequence more powerful when done together. Start slowly, pay attention to how your body responds, and stay patient with the process.
Small, steady effort adds up. If you want more easy wellness guides, check out the next article.